
Photoshop CS3 features and tour
By Colin Smith
PhotoshopCAFE is please to offer you this launch site for CS3. You will find reviews, articles, tutorials, tips, videos, discussion forums and links to all the important places including the download site at Adobe Labs. This Microsite is an open community service from photoshopcafe.com the free resource for Photoshop users. Please feel free to contribute!
So what’s new in Photoshop CS3?
Native Universal.
The engineers at Adobe Systems have been really busy this product cycle. Extensive work has gone into the core programming and Photoshop CS3 is now natively supported on Apple’s, Intel based machines. This means a vast performance boost from previous versions. CS3 also supports Microsoft’s Vista operating system and takes advantage of some of the 64 bit capabilities.
New Interface
![]()
 CS3 now supports a new interface that’s slick and intuitive. Don’t worry, things are still in the same place, more or less. Photoshop is now dressed in collapsible Palette Panes. The palettes can be docked, minimized into icons (click on image at left for full view) or dragged out of the panes to perform the way they always have. This new interface really maximizes screen real estate and lets the application get out of the way of your work. The toolbox can now be displayed as a single column or the standard 2-column for those of us who resist change.
We have new enhancements to the full screen mode (F key). There are now 4 modes:
- Standard: The default view
- Maximized: The pasteboard fills the window and the document is enlarged to the maximum possible size without being covered by any palettes.
- Full screen with menu: Hides the Status bar and fills the screen with the pasteboard
- Full screen without Menu: Same as previous but without any menu at the top. (This is sometimes called the “presentation mode”.)
As always, press the TAB key to hide the palettes, but now scroll to the edges of the screen and the interface will elegantly slide out, awaiting your interaction.
Speed
The startup time has been reduced, the brushes respond quicker and the interface is more responsive in this version.
Photoshop CS3 Features
Ok enough of the application, I’m sure you are ready to get your hands dirty with the new features (you will get a chance to kick the tires yourself on Dec 15th from the free beta download.)
Non Destructive (Smart) filters
The most-wanted feature is probably non destructive filters. Most of the Photoshop CS3 filters can now be applied in a similar way to Adjustment layers. Apply the filters and they can be removed or reedited at any time, this is not just a plus fin the case of change happy clients, but it also preserves the pixels and allows for a cleaner piece of work. 3rd party filters are not supported as non destructive at this point in time. This feature is huge because it now allows for a complete non-destructive workflow for the first time in Photoshop’s 16 year history.
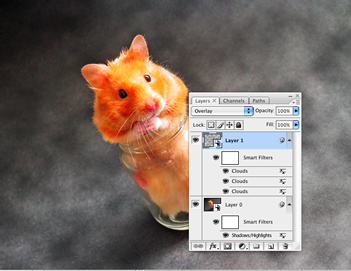
To apply a Smart Filter, the layer must first be converted to a Smart Object. Not a big deal really, we have had almost 2 years to get used to Smart Objects. It’s as simple as right clicking and choosing Convert to Smart object from the Layers palette to make the conversion. (Photo:istockphoto)
Remember the Fade command? Very useful but only available immediately after applying a filter. There are now options to adjust the opacity and Blending modes to the filters at any time. We can now apply a mask to the filters (Smart Filter Mask). My head is still spinning trying to imagine the possibilities!
Filters can be toggled on and off. You can click and drag to rearrange their stacking order or Alt/Option drag to another layer to apply the same filter settings (Make sure it’s a Smart Object first). There is a now an “Open as Smart Object” command in the edit menu, this will help with your smart object workflow.
If all this seems too much, you can still apply and use filters in the same way you always have with standard layers.
Tip: Shadow Highlight is still not an adjustment layer. Apply is as a Smart Filter and enjoy all the re-editable functionality of an adjustment layer with this popular adjustment.
Tip: Double click on a Filter slot to re-apply a filter such as clouds.
Quick Selection tool
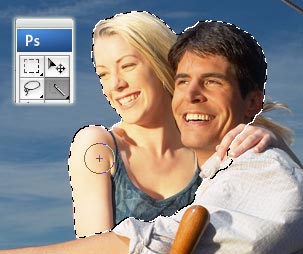 This feature is one of those “Too cool for my shirt” features. When you want to make a quick selection for compositing or masking, don’t grab the magnetic lasso tool anymore. Click and drag with the Quick Selection tool to see areas of your image magically selected, click on another section and like magic the selection grows to encompass this area too. For the over zealous, hold down the Alt/Option key and click on areas that were over selected to refine your selection.
Refine Edge
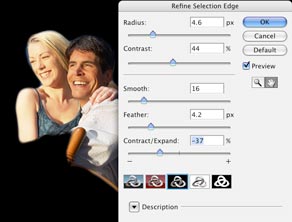 In many of the selection tools including the Quick Selection, the marquee tools and exiting the Quick Mask we can now use the refine edge to get a nice clean edge, eliminating, jaggies, halos and matted edges (think of an extracted layer with a colored outline where it was removed from its background). This works like choking a mask in Channels but much quicker and easier to use.
Vanishing Point 2
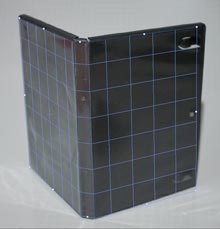 When Vanishing Point made its debut in CS2 it was a feature that amazed the masses. Get ready to be amazed again. When you tear off a perpendicular plane, it’s angle can now be adjusted to anything you want. If that’s not enough, how about pasting a texture and watching it bend around the planes. This is going to be a huge hit for people wanting to mock up package designs.
Tip: Hold down the option/alt key to rotate the plane
Auto-Align Layers
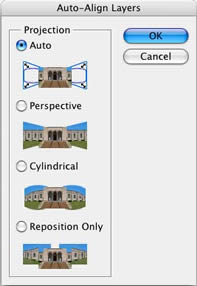 Speaking of amazing tools, this feature combined with the next could very well produce the most Rabbits from the hat out of any other new feature. Based on a new technology, Photoshop CS3 analyzes edges and notable features and aligns layered files to each other. This command will join the edges as seamlessly as possible, think PhotoMerge used for creating panoramas and then think again. Yes, you can create panoramas, the edges align with each other very nicely. But there is more to it than that. Say for instance you have several photos from a group of people, or an exposure bracketed image. Place all these images onto layers in the same document and then run Auto Align. The images will warp and stretch to match each others position and shape so that you can use masks to selectively choose components from each to compose your masterpiece. PhotoMerge is still available for those who want to automate the process.
There are four Projection Methods you can choose from: Auto, Perspective, Cylindrical or Reposition only
Auto-Blend Layers
Tying right into Auto-Align Layers is Auto Blend. This command will figure out the smoothest way to blend multiple images together. When the Auto-Blend command has finished, Layer masks will be created to manage the seamless integration and as such you can manually tweak the Layers if you desire. The exposure settings will also be adjusted to that the tonality of the layers also match. Get ready to create 100 mega pixel images from your 5 mega pixel camera!
Merge to HDR 32 Bit Imaging
Photoshop CS2 saw the advent of Merge to HDR (High Dynamic Range), a way to create an image with an extended dynamic range. Basically a camera is limited in the amount of shadow and highlight information that it can record at the same time. Many times, if you shoot for the shadows, the highlights are blown out as a white area. Or shoot for the highlights, perhaps out a window and the interior walls lose their detail and become a blob of black. Photographers get around this limitation by taking multiple Photographs, adjusting the exposure of the camera each time (Bracketing). All the Photos are then placed together in layers and then tedious use of layer masks allow the Photographer to reveal areas of each picture to produce an extended dynamic range.
Merge to HDR, will automatically merge all the images together into a single 32 bit image that has a much wider dynamic range than traditional images. These HDR images are used a lot by 3D artists and videographers to produce texture maps, lighting masks and more. Photographers also make good use of these new features to create stunning Photographs with incredible clarity in the shadows and highlights. CS3 uses the auto-align technology to help keep all the photos sharp by removing the problems of mis-registration where the camera has moved slightly in one or more of the images. We also see some drastic improvements in Merge to HDR in CS3.
One of the challenges is converting HRD to 16 or 8-bit formats for printing or online display. This is done by altering the response curve during conversion time. CS3 allows you to save your curves as presets, which will save a lot of time. Could this be the year that HDR image come to the forefront of Photography? Perhaps.
We also have more filters available to the 32 bit color space as well as the ability to create a new 32 bit image in Photoshop CS3.
Black & White adjustment
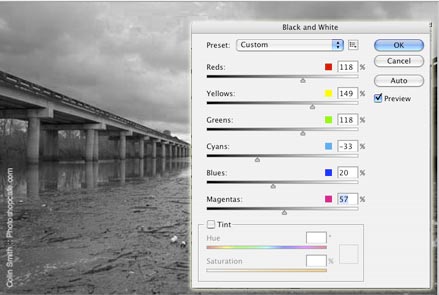 For a long time now, experts have been telling you not to hit the desaturate command to convert a color image to grayscale. If you take that quick and nasty route you will not only toss away the majority of your tones, you also lose the opportunity to mix your own grayscale conversion. The Black and White adjustment is brand new in CS3 and it allows you to create a custom conversion based on the information contained in the RGB (Red, Green, Blue) values of the image. Not only that but you also have control over the CMY (Cyan, Magenta, Yellow) values too. You can now choose the luminosity values of each channel associated with 6 colors and create a custom grayscale mix. In English please? Adjust the sliders and create a really cool grayscale image that looks exactly how you want it to look. This is the tool you should use for most of your black and white conversions, its quick, easy and looks great.
Hit the tint button and you can create a monochrome image by applying a single color to your grayscale image. This is what many people incorrectly call a duotone (I’ll explain what a true Duotone is some other time). The Black and White Adjustment works as an adjustment layer. If you prefer to use the Channel Mixer, there as a warning that displays when all the channels don’t add up to 100%.
tip: Click and drag on your image to adjust the underlying tone
Curves are Cooler
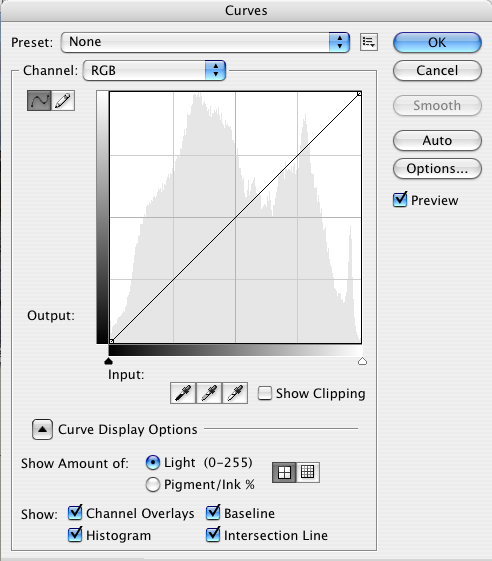
Adobe has made some major improvements to the Curves adjustment. This is the tool of choice for the advanced/serious Photoshop user. A histogram has now been added which is similar to Camera Raw in CS2. Channels overlays display the changes to each channel. In the past if you altered a single color channel, it wasn’t reflected in the overall display of the curves in composite (default) view.
Brightness/Contrast
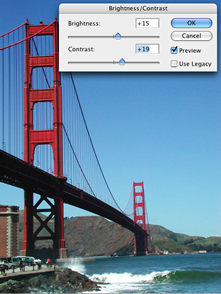 Adobe has enhanced this tool to work more like the equivalent in Camera Raw, so it no longer clips the image as soon as you touch it. If you want the old behaviour which is useful for adjusting masks and creating comic type effects, click the legacy button and the adjustment will work just like it always did.
Two New Blend Modes
We now have the Lighter Color and Darker Color blend modes. What makes them different from the Lighter and Darker modes is that they work as composite rather than by channel. For example if you apply yellow to a red image, the threshold will be determined by the luminosity value (grayscale) rather than by the color value of each channel. If this doesn’t make much sense to you, just try it out and see what it does (as with most blend modes, the proof’s in the pudding).
Clone Stamp tool
The clone stamp tool now sports a few new options that really make it more useful. You can now get off your knees, the clone stamp now has a preview of the sampled source. Press the Shift+Option key to see an overlay or choose overlay from the new Clone Source Palette. Speaking of the Source Palette, you can make samples of 5 different sources, these can be from the same document or from multiple documents. You also have options to use the current layer or include the underlying layers. You can also choose to include or ignore adjustment layers thanks to a neat little toggle button on the options bar.
![]()
![]()
Eyedropper Tool – sample sizes
As image resolution has grown, the old point sample, 3×3 and 5×5 have become very outdated. 11×11, 31×31, 51×51 and 101×101 have now been included. It’s now possible to sample the average color of a larger image region.
Camera Raw 4
Camera Raw is now in it’s 4th version. The first was a standalone plug-in for Photoshop 7, then Photoshop CS and CS2 contained 2.0 and 3.0 of Adobe Camera Raw (ACR). In it’s 4th version, many of the features of Lightroom have found their way into Camera Raw and so they should.
A big feature is that we are no longer limited to Raw files, we can now open jpg and tif files in ACR. (From the menu in Photoshop, choose open and then select Camera Raw from the Format drop down list on the left). The files are not converted to Raw (that wouldn’t be possible) rather, the controls of Camera raw are now available to the jpgs and tiffs.
When it comes to adjustments there are lots of new options, Parametric curves for those who are intimidated by point curves. This provides adjustments similar to levels from within the curves environment. There are recovery and fill light sliders that bring a shadow/highlight type functionality into ACR. We now have a ridiculous amount of control of the colors and luminosity of our images through the 8-band HSL sliders, also providing a grayscale adjustment that is unmatched. Split toning is a great way to target specific colors and add saturation to them, such as making skies bluer.
Check out Tim Cooper’s great article for more info on Camera Raw 4.
Open PDF
We now have more options for opening PDF files. Images can be opened individually or entire documents. You can now choose the desired size and resolution before opening the PDF inside Photoshop.
Enhanced printing
The Print dialog has been overhauled and made easier to use. Photographers will herald the arrival of a color-managed preview. Preview? Yes, I didn’t mention that the print with preview now replaces the print dialog. We are now being prodded in the direction of accurate color prints. You can change the orientation of the paper, choose different printers and select the number of prints. More user-friendly dialog has been added to the print controls along with a reminder to turn off your printer’s color management if you choose Photoshop’s color management. (A small detail that has resulted in increased ink sales and the depletion of forests).
For Web
Most of the features from ImageReady have been ported over to Photoshop CS3. Rollovers, slices and the appearance palette didn’t make the trip over. Other features such as variables have made the transition. It’s a little bit of an Easter-egg hunt to find where the features are now residing, but they can be found without too much trouble. ImageReady is now dead, it no longer ships with the Photoshop as the lack of the Jump to ImageReady dialog box tells. Save for web is now the way to send your images off to the web as HTML and CSS pages.
Device Central
This is a new addition to save for web. You can now preview your designs in templates of most of today’s popular devices, mainly phones. This is a great tool for people developing content for mobile devices and want to see how their artwork will look on different devices. Read more on Device Central
Photoshop Extended.
From Adobe “The Photoshop family of products is growing. With the launch of Creative Suite 3, customers will be able to choose from two new editions of Photoshop. In addition to Photoshop CS3 software for designers and professional photographers, we will be introducing Photoshop CS3 Extended, which provides adventurous creative professionals with groundbreaking integration of 3-D and motion graphics, while also meeting the specialized needs of industries such as engineering, manufacturing and medicine. Both applications will be available for both Macintosh and Windows platforms.”
That means that there will be another version of Photoshop with more features that apply to users in the Video, 3D and scientific industries. Information on the exact features, pricing and Suite configurations is not yet avaliable. There will be no public beta of extended. For professionals in these vertical industries, this is very exciting news. Adobe aknowlesges that these industries are using Photoshop, as such is incorporating features to assist in these tasks.
Industries served by Photoshop Extended.
– Film and video creative professionals
– Multi-media creative professionals
– Web and graphic designers using 3D and motion
– Architecture, Engineering and Construction (AEC) Professionals
– Medical imaging and scientific research professionals
– Manufacturing professionals
In a nutshell, extended allows you to import and texture 3D. It allows you to import and export Video as video layers. It also support Dicom for High resolution output of medical files. We will keep you posted with more info on extended soon.
See you at the cafe,
Colin
One thought on “Photoshop CS3 features and tour”
Leave a Reply
new features released in Camera Raw 9.1 update. New feature review of Camera Raw in Photoshop CC 2015, Dehaze, Merge...

New Dust removal in Photoshop ACR automatically removes dust and spots from photos

Best ai 1 click selections in Photoshop. Object Finder vs Select Subject


Very informative, straight to the poiny