
Understanding Image Resolution in Photoshop for beginners
Understanding Image Resolution in Photoshop for beginners
This video and written guide explain what image resolution is in Photoshop. You will understand image size and resolution so you can figure out the perfect size for any print on on screen project, so everything always looks sharp.
Has this ever happened to you? You choose a photo and you drop it into another picture and suddenly the size isn’t what you expected? This happened to me the first time I used Photoshop. Once you understand image resolution and size, it becomes much easier to work. I’d say this is a fundamental skill you need to understand.
Or maybe someone asks you to deliver an image at 300 dpi, or at 2,000 pixels on the long edge. This lesson will explain all this to you.
In order to really grasp this, its best to watch the video above, where it’s clearly explained in a slow and concise manner.
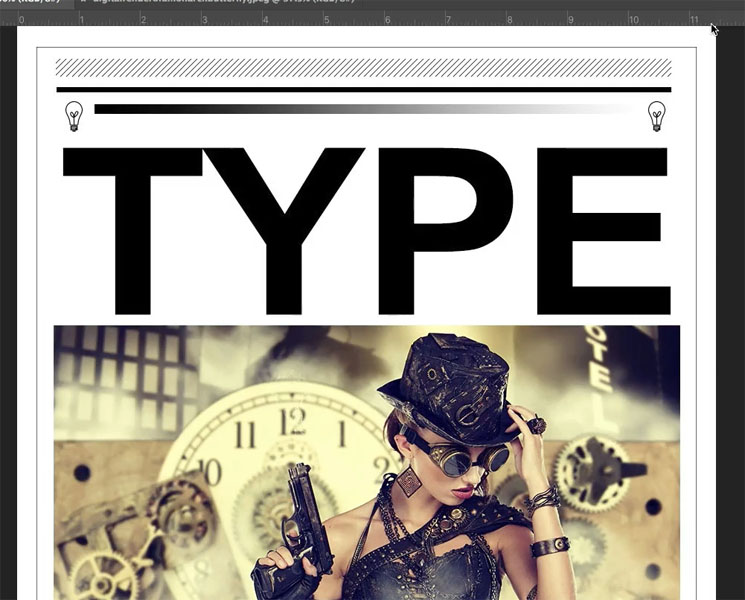
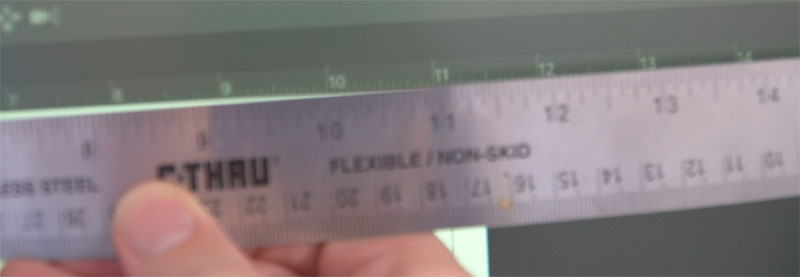
Let’s take this image, I opened the rulers (Ctrl/Cmd+R) and it’s just over 11 inches.
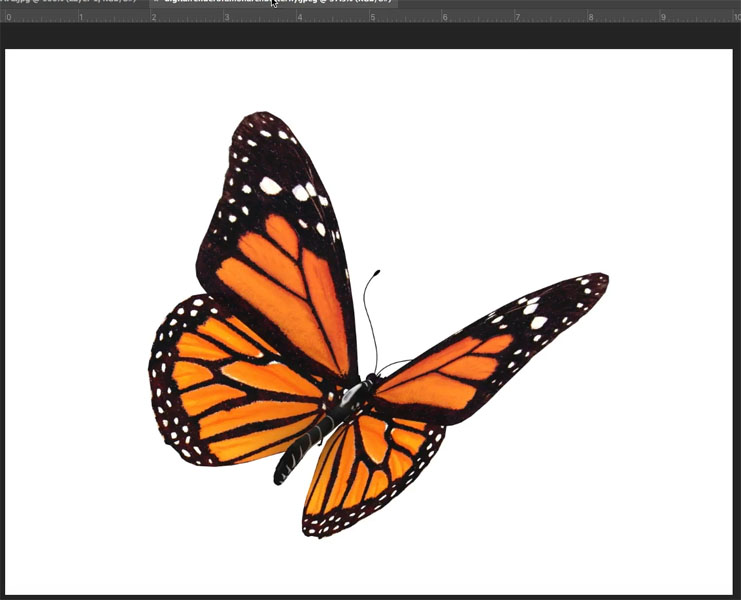
And this image below is less than 10 inches.
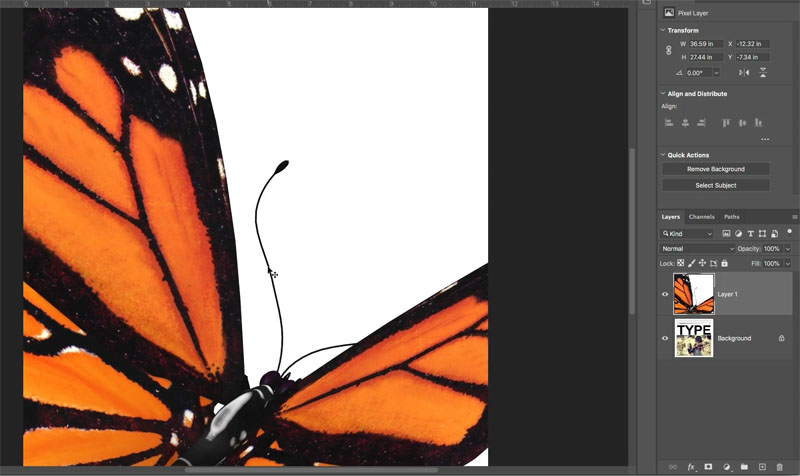
When I drag or copy and paste this “smaller” butterfly into the main image, (How to combine photos in Photoshop) suddenly it’s huge! Why? I’ll explain all this.
The difference between DPI and PPI
There are 2 terms you will hear, DPI (Dots Per Inch) and PPI (Pixels Per inch). These would be DPCM (dots per Centimeter) or Pixels/cm (Pixels Per Centimeter) if you’re outside the United States. I will use inches, but substitute cm for inches and everything works exactly the same.

Very often you will hear these terms used wrong. Some people just call everything DPI, and they are probably from the analog age and never updated their vocabulary for digital, which is ok. Very soon you will know what they mean.
Both of these terms are used to describe density which is otherwise known as resolution.
The difference is:
- DPI (dots per inch) is for Print. (the dots are dots of ink on paper or other surfaces).
- PPI (pixels per inch) is Pixels. (digital resolution on a screen)
The average standard for print is 300 dpi. This means if you take a 1-inch square and count all the dots of ink, there are 300 dots in that 1 inch area. This is a high resolution file, because it’s a high concentration of dots. If you were to print at a lower resolution such as 80dpi, the dots are large enough to be seen with the naked eye. (Of course printed resolution can be much higher than 300, but let’s just take 300 as a standard (It still is the standard) as it’s sufficient for most projects and this is a beginner’s guide so I won’t get into line screen and other things that you don’t need to understand this concept.)
So the measurement of print resolution is how many dots are in an inch. The higher the number, the higher the resolution.
Ok, lets talk Pixels Per inch (digital)
If you never print, then you don’t even have to worry about DPI, as you will never be dealing with dots. The good news, is that formula is the same for DPI and PPI and if you need a 300 dpi print, the file can be in 300 ppi as the print software converts it, but I’m getting ahead of myself.
On a screen, the resolution is measured in pixels per inch (or pixels per centimeter). In the recent past, all screens were pretty much at 72ppi. Now with HD, 4K, 5K and retina displays on laptops, tablets and phones (yes phones also use ppi) the resolution could be anything, often approaching the resolution of print. I will teach you how to figure out the resolution of your monitor very soon, if you don’t know.
Ok, here we go,,,
The only number that matters on a screen is the actual Dimensions in pixels. That’s a bold statement, but let me show you.
Remember the image of the butterfly? It was 10 inches wide.
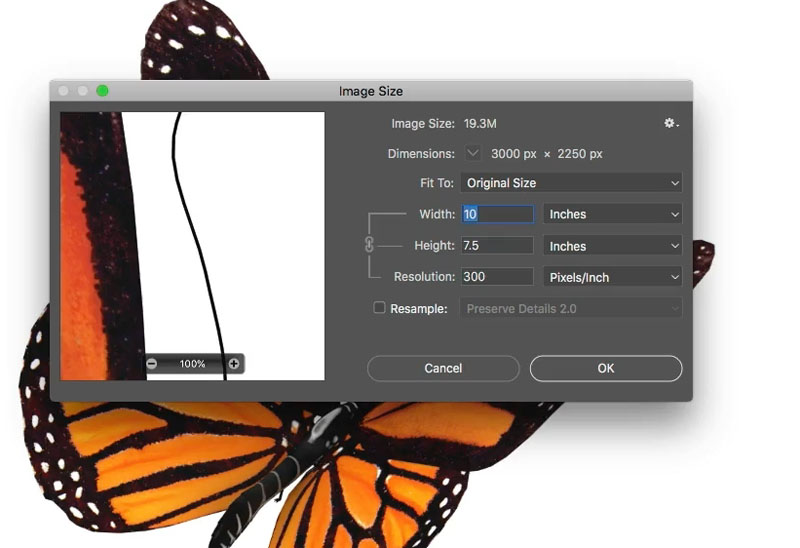
Look at the dimensions in pixels, it’s 3000 px X 2250 px (image>image size)

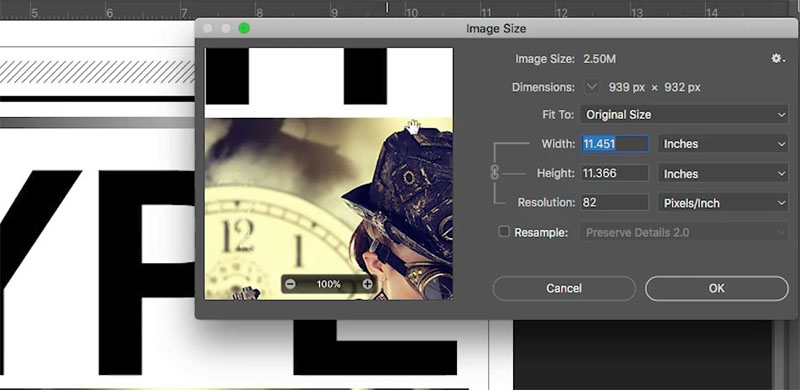
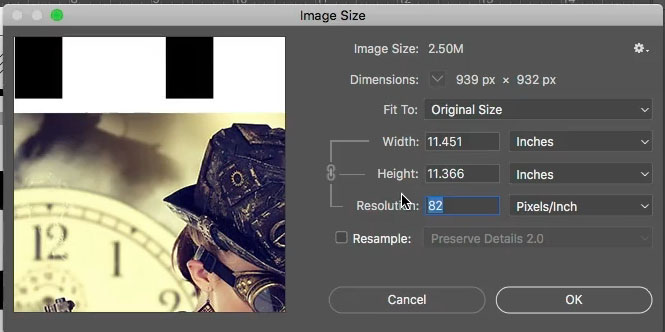
And the other image was 11.451 inches, but its actual pixel Dimensions are only 939 px x 932 pixels.
So how can the butterfly at 10 inches appear larger than the 11.4 inch image? Because of resolution.
The butterfly is at 300 ppi while the other image is only 82 ppi.
This is why the dimensions in actual pixels are important on a screen, and this is the actual size of the image.
There are 3 components to an image size/resolution.
- (D) Dimensions: the actual size in pixels
- (S) Size: In inches or cm
- (R) Resolution: How many pixels in that inch.
We can calculate the dimensions if we multiply the size by the resolution. for example, if you need to deliver a 10 inch image at 100 ppi you would need the dimensions to be 1000 pixels (10 x 100 = 1000)

Let’s look at this closely.
The original file we looked at is 939 pixels wide (width always comes before height)
This image is at screen resolution 82 ppi (the resolution of the monitor, 82 pixels fits into a single inch of screen size) The width of the file is 11.451 inches.
So, to calculate dimensions 11.451 x 82 = 939 (S x R = D)
To figure out Size: 939 ÷ 82 = 11.451 (D ÷ R = S)
To figure out resolution: 939 ÷ 11.451 = 82 (D ÷ S = R)
Looking at this image, we have enough pixels to display it nicely at 11.451 inches if we are at 82 pixels per inch. It will look good on screen.
With the resample turned off. If we change the resolution to 300 ppi (enough for print) we will only be able to print this at 3.13 inches. Notice that the Dimensions dont change, so this is the same size as the previous shot.
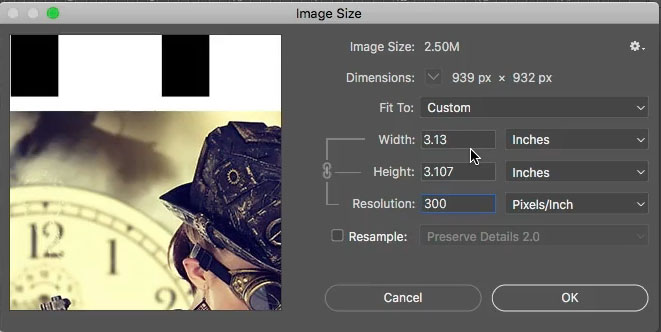
On a digital file, the only thing that affects its actual size is the dimensions in pixels. The resolution tells us how large a file can be at that resolution.
This is useful if you know you need to create an image at a certain size and resolution.
Figuring out the size you need for a new document
Say you are going to create a poster at 10 inches by 7.5 inches. This will be printed at 300 DPI. (You will always need 2 pieces of information when prepping a file, the final size (in inches or cm) and the resolution). If they don’t tell you the resolution, assume its 300 for print.
So you would figure out 10 x 300 which is 3000. So your document would need to be 3000 pixels wide.
The height is 7.5: 7.5 x 300 = 2250 px.
Your poster would need to be created at 3000 x 2250 px. Of course you could just type in the width, height and the resolution and Photoshop will do the math for you, You don’t actually have to do this math, but to understand what’s happening, you need to know how it works.
Working on screen
You should never evaluate the size of an on-screen image in inches or cm, only in actual pixels. The only number that matters on a screen is the actual Dimensions in pixels. (the resolution really only affects the rulers in Photoshop, it’s a made up number that helps you calculate image size for print. The only thing that exists are the actual pixels).
If you are only ever working on screen, change your unit of measurement to pixels and work in pixels. To change the unit of measurement, Press Ctrl/Cmd+R to turn on rulers. Right click on the ruler and choose the unit you want to use.
One last thing, you can use the resolution to display at actual size on your monitor
Remember we talked about screen resolution? Why does that matter?
If you have the resolution of your file set to your screen resolution, the image will display at actual size when you are at 100% magnification.
You can also figure out your screen resolution by:
Set your magnification of your image to 100%
Measure the document on screen with a ruler.
Go to image>Image size
Turn off resample and type in the width in inches (or cm)
The resolution will update to display that actual resolution of your monitor. Now 1 inch on the ruler will equal 1 inch on your screen. (pretty cool huh).
Alright, that was a little more technical than our usual step by step tutorial. I hope it was useful to you. If you don’t quite get it, watch the video, it makes it really simple.
I will be adding another tutorial on how to resize you images.
Are these beginners tutorials (or more accurately fundamental tutorials) helping you?
Great to see you here at the CAFE!
Browse our hundreds of other free tutorials here, or search for what you are looking for in the search at the top of the page.
You can also browse by topics in the free tutorials menu.
If you are ready to get serious about Photoshop, see our full length courses here
PS Don’t forget to join our mailing list and follow me on Social Media>
(Ive been posting some fun Instagram and Facebook Stories lately)
You can get my free Layer Blending modes ebook here
If you like these techniques and you would like to dive deeper into Photoshop, I have just launched an in-depth Photoshop Course. Its called Photoshop Secrets: Photoshop 2020 for Digital Photographers, Check it out here

PS Don’t forget to follow us on Social Media for more tips.. (I've been posting some fun Instagram and Facebook Stories lately)
You can get my free Layer Blending modes ebook along with dozens of exclusive Photoshop Goodies here


33 thoughts on “Understanding Image Resolution in Photoshop for beginners”
Leave a Reply

Use the hidden photographic toning presets in Photoshop, for pro color grading with gradient maps.

Learn how to make the X-Men logo in Photoshop. You will learn both the 3D and 2D way. Convert any...
How to make jaw dropping photo realistic embosses in Photoshop. This photoshop tutorial shows how to make 3D looking bevels...


I’m not a beginner (76 years old). This was worth the time spent. I will recommend it to my camera club friends.
Hi Colin. I use Photoshop to make prints of my artwork. I am still figuring out the right formula between the camera, Photoshop, and the printer. This tutorial was helpful in getting closer to that formula. Thank you 🙂
Very clear and informative. Thank you
Thanks Colin. I seem to spend a lot of time trying to explain this to my clients. You gave me a few ideas to help people understand this better.
Hi Colin,
This was Great Tutorial!! The one thing that I wasn’t aware of is the monitor resolution. That really helped me. Also, maybe in another tutorial you could cover “Resampling” and how that affects our photos.
Thanks
Dennis
Thats the next Beginner Saturday tutorial
To say Dimensions = Size x Resolution is very confusing. We need to distinguish vertical and horizontal sizes (and dimensions). It is more accurate to say Dimensions = Vertical Size x Resolution by Horizontal Size x Resolution.
Dimensions is not a single number – Notice the “S” on the end of that word. I know what you mean and you know what your mean, but my students are confused by this. p.s. – Huge fan of your work. Recommend you highly! Thanks!
Awesome!
Collins, what’s the story about the pixel aspect ratio stuff? I did some video editing work for european people and at rendering time, it always gave me bad feelings!
Thanks Colin. I’ve worked in PS forever and consider myself an advanced user but sometimes revisiting these “simple” concepts is so enlightening. Really enjoy your presentations.
Colin,
Perfect, perfect! I’m not real new but boy did this help simplify resolution and sizes.
So I have a client that needs poster size. So now I know how to size it for the photo printer. Huge help as all you information is. Bless Colin the magician.
I like the part about changing from pixels to inches or vice versa, something I didn’t know but will help in future edits. As always, I’m learning something new. Thanks!
I prefer in-depth. Keep it up.
Saturdays for beginners is good.
I have an Adobe web-site portfolio. Some of my pictures take forever to open. How do I down-size them for web use?
Hey Colin, thanks for a great video! No, it was not too long. I will recommend this to my beginning Photoshop students. This is a topic I introduce in the first class, and I tell them you have to hear this several times in order to get you head around it. I also use a large photo into a small one, and vice versa, to give them a literal demonstration on why when you do this the smaller one looks like a postage stamp! I’d like to know how I can find my monitor’s resolution? In About this Mac, I get my 27″ iMac display is 5120 x 2880. I can’t find anything else. I’m afraid I was assuming it was 72ppi because that’s what I was taught 🙁
Fantastic as usual Colin thank you. A quick tip for some people, If you want to know the resolution of your screen,
First find the information about you monitor in your computers system information, for example on a Mac click on the apple symbol and then on about this Mac, in the overview tab click on system report then click graphics/displays and you will see your screen resolution. Mine is 1920 x 1080 (Width x hight) Now physically measure the width of your monitor, mine is 18 3/4 or 18.75 now divide the resolution width by the physical width 1920 ÷18.75 = 102.4
Now when I change the resolution size of a photo in photoshop via image image size and then hold a ruler to my image on screen like Colin did everything lines up nicely.
As usual, a brilliant video explaining the fundamentals of what may have been confusing but described in easily understood concepts. You are a born teacher!
More videos on the fundamentals would be excellent. 🙂
Fantastic video. My question is… if you want to give high resolution files to someone that they’ll probably want to get printed, but you don’t know exactly how big they’ll get them printed .. is there a recommended “standard” size and resolution that would be good to choose?
If you don’t know what size it will be printed, then deliver the image at full size, 100% of what you have.
Thanks. It’s obvious that you put a lot of work into your tutorials and … we appreciate that. 🙂
You write: “The average standard for print is 300 dpi. This means if you take a 1-inch square and count all the dots of ink, there are 300 dots in that 1 inch area.”
This is actually NOT correct. In that square(!) inch area of 1 x 1 inch you have 300 x 300 = 90.000 dots as as the 300 dpi is a linear (one-dimensional) count whereas a 1 x 1 inch area is a two-dimensional space where each of the 300 lines of dots contain 300 dots making it 90.000 dots in total.
You are correct, I was using the horizontal value of the image as an example, to keep it simple, you will notice I only included the vertical values near the end, I even measured the horizontal value with the ruler, its hard to say this stuff clearly while-keeping it simple.
Hi.
Excellent, But i think maybe itcould be a little clearer.
The Webb or the monitor is not looking at the dpi/ppi values, It ignores them vwhen the photo is displayed.
It is easily confirmed if you take a photo and decrease the dpi to let us say 50 and save it. Then take the same photo and increase the dpi to 400 all without changing the physical size. When you open them they look exactly the same on the display.
Yes, they are the same, I said that very clearly on the video
You say:
“DPI (dots per inch) is for Print. (the dots are dots of ink on paper or other surfaces).
PPI (pixels per inch) is Pixels. (digital resolution on a screen)”
300 is a confusing number to use for both PPI and DPI.
You say:
“The average standard for print is 300 dpi. This means if you take a 1-inch square and count all the dots of ink, there are 300 dots in that 1 inch area.”
No, there 300 pixels printed out on that 1 inch area.
PPI may be 300 (defining the size of the print) but the number of ink dots per inch (defining the quality of the print) is more likely to be a lot more than 300 – in the range of 1440-2880 dots per inch. Only very simple consumer-grade printers print lower than this.
300PPi in this context means that the printer will print 300 pixels on each linear inch of paper using 1440 dots of ink per inch (DPI).
PPI is not really ‘resolution on a screen’. PPI is the resolution of the screen itself. An image is composed of pixels and pixels do not have a resolution. Pixels are just pixels with no size and certainly no resolution.
If you display 3000 pixels on a screen you will get 3000 pixels.
If the screen resolution is 300PPI the image will be 10 ins wide.
If the screen resolution is 150PPi, the image will be 20ins wide.
The pixel dimensions do not change.
Woah there Mr Jump to conclusions.. 300dpi is for printing to an offset printing press. (designers not photographers) most magazines are 150-175LPI and 300 is double line screen. Its been the industry standard for 2 decades, almost every professional designer delivers in 300dpi for the majority print jobs, there are exceptions, some higher and some lower, but 300 is what clients ask for. Remember we have as many designers reading this as we do photographers, and print design is my background at an agency and for magazines, not desktop printing.
Part 2 of your rant you are agreeing with what I said “pixel dimensions don’t change.”
You know, it’s not that easy making a beginners tutorial, you should try it sometime.
And BTW, the software here holds new comments for approval, there was no need for your rude comments in your second comment. You jumped to a second conclusion.
I’m not a beginner but this was worth my time, Thank you.
Pete
Both you and Colin are wrong in this.
Pixels are not dots and dots are not pixels.
The “average standard for print” is not 300DPI – it is 300PPI for Canon and 360PPi for Epson printers – PPI (pixels) which define the of the print output.
The average DPI for print is not 300. It is 1440-2880. DPI (dots per inch). DPI defines the quality of the print.
It is disappointing that Colin appears to be confused about his own use of terms in a teaching article.
Typically a printer (Epson) that has a native pixel rate of 360 PPI will use an 8×8 dot matrix for each pixel. That means it use 8 horizontal dots in each line, and print 8 lines to get a single pixel. Thus there are a total of 64 different dots of ink that make up the colour of a single pixel. Instead of one big dot, 1/360th of an inch in size, the printer puts down 64 different dots of ink, each 1/2880th of an inch in size into an area that totals 1/360th of an inch. These dots may not be the same size and are subject to dithering – relating the dots in one line to the colours of the dots in the previous and next lines.
In other words, such a printer (Epson and Canon) will be laying down 2880 DPI (dots of ink per linear inch of paper).
The printer’s stepping motor will advance the paper at a rate to lay down 1440 DPI.
Total number of dots per square inch is 2880×1440. Do the math.
John,
I’m trying to keep this simple, so beginners can understand.
When I say 300 is the average for print, I am referring to a commercial offset printing press, not a desktop printer. This is for designers as well as photographers. It’s very common in the industry for people to request 300dpi images for a print job. In fact in 25 years of doing this for a living, I could count on one hand the amount of people who have requested a different res, actually, probably on one finger, you’re clearly not woking in agencies and design shops. I could talk about LPI, screen angles, document profiles and all the other things, I’m sure you know as well. And yes, I print to my Epson P800 at 360 and let its software do the interpolation. I’m not confused, I’m just being general, because this is a “for beginners” article as it is names. Why do “experts” get so upset when I simplify things so beginners can understand?
Thanks Colin
You are right, I am a photographer, not a designer.
The point I was trying to make is that many print shops ask for a 300 DPI file when in fact they should be asking for a 300 PPI file to print at a specified size.
A great deal of confusion arises on this topic because people use sloppy terminology (which in any event they don’t understand) – and end up talking at cross purposes.
Print shops ask for 300 PPI/DPI because they associate that with a ‘high quality’/’high res’ image but have no understanding that 300PPI is only of use if there are sufficient pixels in the file to produce a print of the required size. So the poor client resizes (resamples) a perfectly sized original file (but tagged 72PPI) to 300DPI – and is disappointed when he gets a very large, very blurry print.
Even funnier are photo competition organisers who ask for 72DPI JPEGs as if the 72DPI had any relevance whatsoever to an image that was going to be viewed on a monitor or TV screen.
John, I see we are in agreement and basically saying the same thing. Your last statements about print shops and photo competition organizers organizers is spot on. That mentality was the inspiration for this article. And you are correct, you are giving the printer pixels, not dots. That’s why I made 2 conclusions in this article. #1 the true size is the actual dimensions in pixels, #2 you need 2 pieces of information to describe an image size. Resolution + Target size.
Thanks, Colin
I didn’t do any math to find a screen resolution. I opened a document of known size and 100% view was way too large to measure. I just reduced the percentage size of the image until a handheld ruler became accurate with the photoshop rulers. It only took three tries to narrow it down accurately from an initial visual. Now I know that screen % setting gives me 100% of the image size.
Awesome, glad it all worked out 🙂
Colin,
Something that I’ve never understood is the reference to ppi on monitors. I.e. 72 or 100 ppi on a 13-inch monitor is not going to be the same as on a 27-inch monitor or a 65-inch monitor. When you measure an image with a ruler, isn’t the measurement going to be subject to the size of the screen? Great information and yes I will watch it again!