
How to Turn day to Night in Photoshop Tutorial
Turn Day to night, AKA: Day for Night in Photoshop Tutorial
Turning day into night, or day for night as it’s called in the VFX/Film industry. This technique actually comes from filming during the day and then turning it into night with different tricks and post production. In this Photoshop tutorial, I’m going to show you how to take a daytime photo and then turn it into a nighttime scene.
I’m going to show you my method of day to night, which is a simple 3 step process, where we focus on creativity. There are some techniques that I use to set things up. The rest of it is brushwork and a couple of tricks. I don’t know why, but this is something I really enjoy doing. It’s a lot of fun. I’m going to keep this example fairly simple, so that you can follow it easily. Don’t worry if your first few attempts don’t look great, keep practicing.
You will want to watch the Day to Night video to see the workflow.
Then come back and follow the steps on this page to actually do the Photoshop tutorial (and bookmark for reference).
Turning Day to Night in Photoshop, Step by step instructions
There really are just 3 steps:
- Create night color toning.
- Set up Layer masking.
- Paint in illumination.
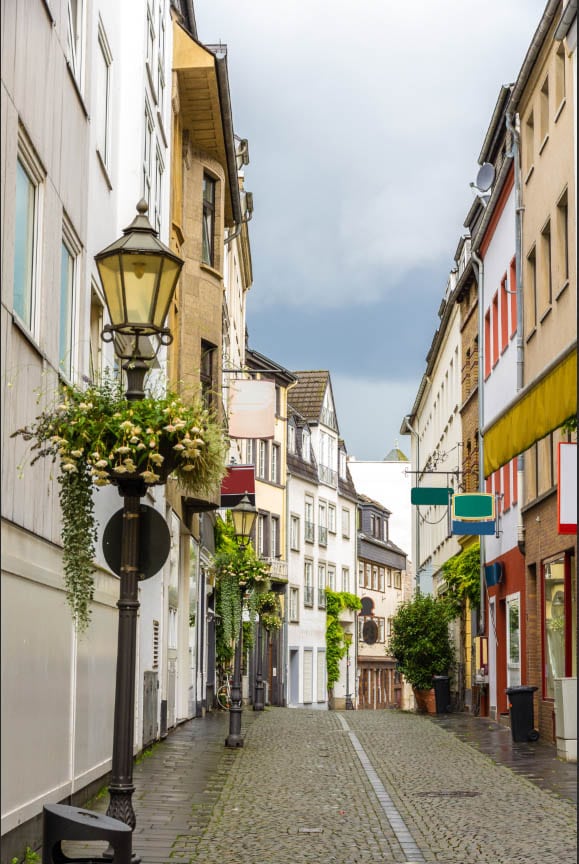
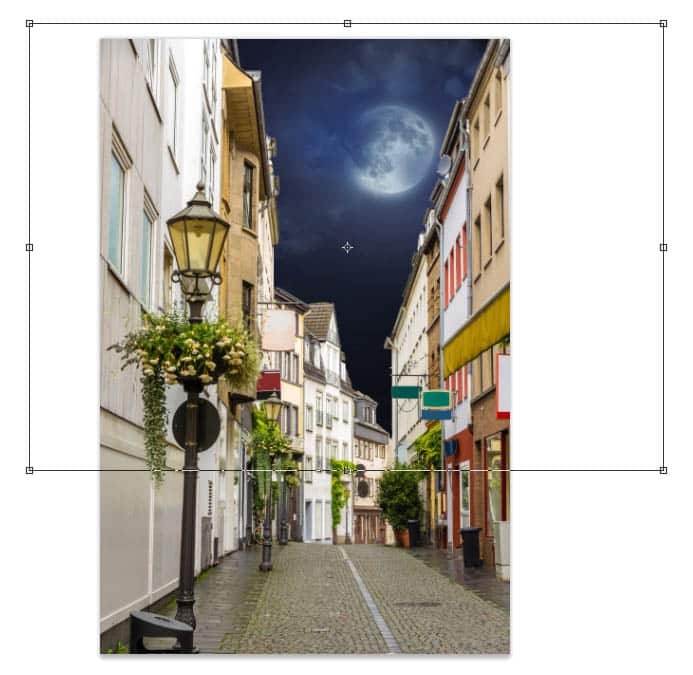
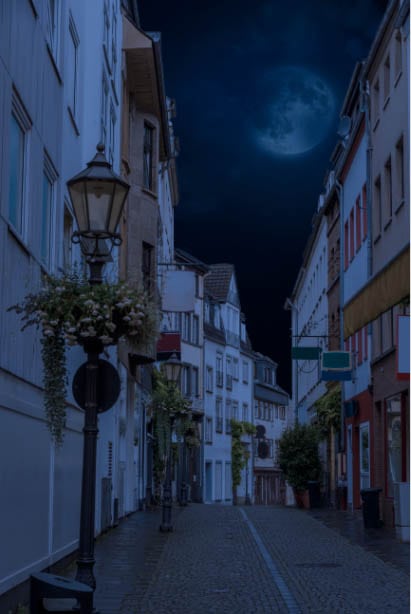
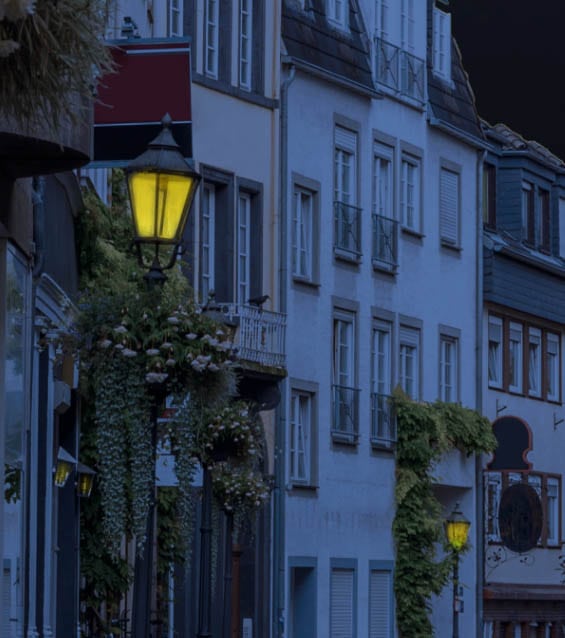
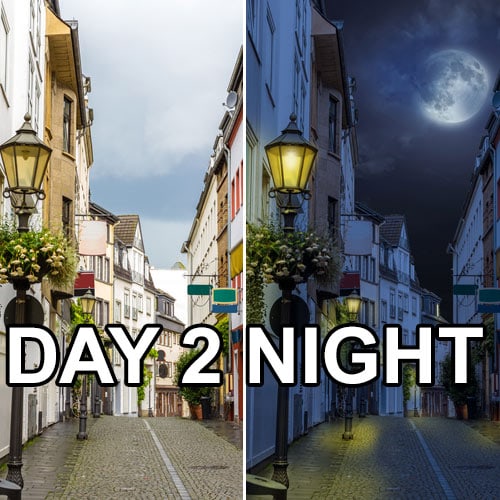
I will split it up into a few more simple steps to make it easy to follow for any image. Let’s begin with a photograph taken during the day. To make it easy for you to follow, I have used this image from Adobe Stock.
Step 1. Replacing the day sky, with a night sky
Rather than just darkening down the sky, let’s actually replace the sky with a nice night sky. It’s the quickest way to get the best result. (When you are doing commercial Photoshop work, it’s all about speed).
a. Grab the quick selection tool.
![]()
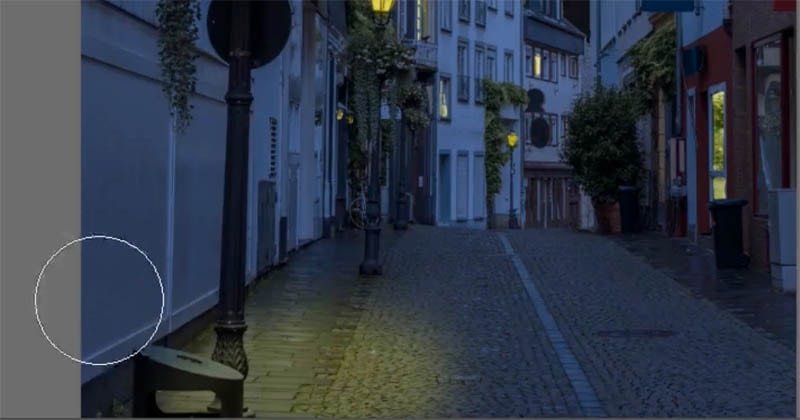
b. Drag around the sky area to make a selection (Use the Alt/Option key and drag to deselect if you go over the lines).
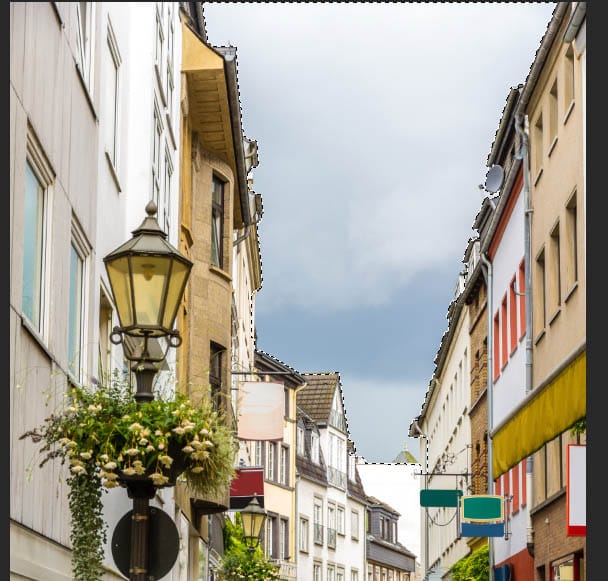
The white wall at the end of the street is very boring and could end up looking like a mistake, so I have also included it in the selection.

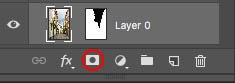
c. When you are happy with your selection, click the add layer mask button in the layers panel
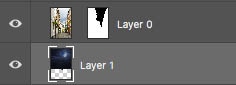
You will now see a mask and transparency in the sky.
(If the sky is showing and the buildings are hidden, click on the layer mask and press Cmd/Ctrl+I to invert the mask.)

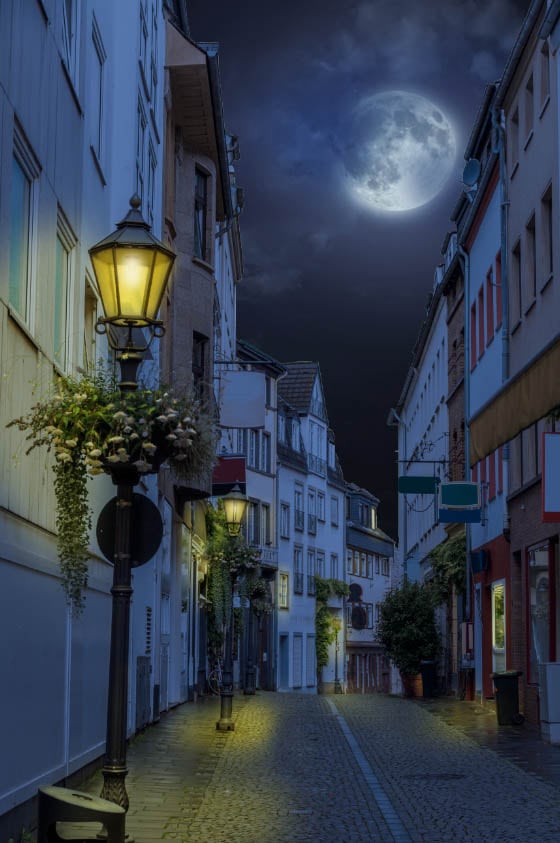
Now we need to drop in the sky. Here is another Photo I gabbed from Adobe Stock on the night sky.

d. Bring the sky photo into our image (don’t forget, you can watch the video at the top to get clarification on steps you get lost on).
Here is an easy tutorial on combining photos in Photoshop
e. Drag the sky to the very bottom so that it’s underneath the street scene and then reposition it.
f. Press Cmd/Ctrl+T for free transform.
Shift+Drag on the corner handles to resize the sky photo and position it.
Step 2. How to turn a daytime photo into night in Photoshop
This is where we will make the photo look like its night time, the day to night effect happens like so. The good news, is it’s really easy thanks to LUTS in Photoshop CC.
If you are on an earlier version for Photoshop, do the same thing using Curves (Step 4.c but reverse the curve on the Blue channel to make it more blue, instead of yellow).
Make sure you choose our picture of the street.
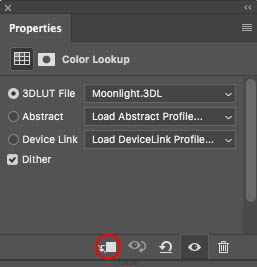
a. In the Adjustment layers in the Layers panel, select Color Lookup
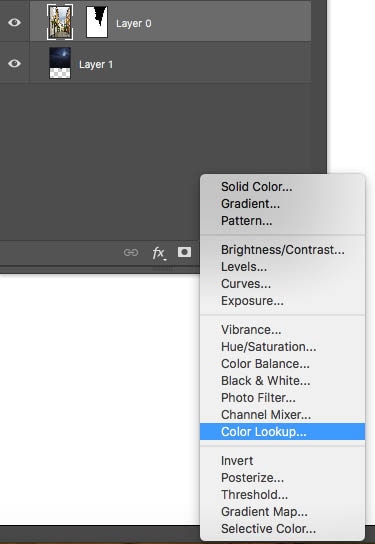
In the properties panel, click on the dropdown, next to 3DDLUT File. We are going to use a LUT (Lookup table, it’s a color and tone preset).
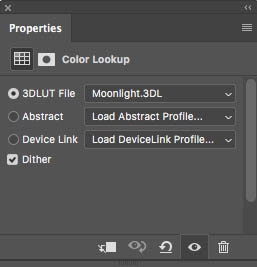
b. Look for Moonlight in the list

Once you have selected the moonlight LUT, the photo will now look like night time. This is just the first step, we still have a lot to do.
c. I don’t like how the LUT is affecting the sky, let’s change that. (If you didn’t do a sky replacement, you can skip this next step).
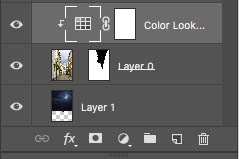
Step 3. Isolating the color from the sky | Single Layer targeting with Photoshop adjustment layers.
A cool thing about using adjustment layers, we can target all the layers beneath the adjustment, or isolate it to just a single layer. We want to affect the street layer, but not the sky. Here is how to target a single layer with an adjustment layer.
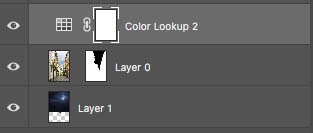
a. Make sure the adjustment layer is directly above the layer we want to affect.
b, In the Properties panel, you will see a little square with an arrow. Click it
Now the adjustment, will be clipped to the layer directly below it.
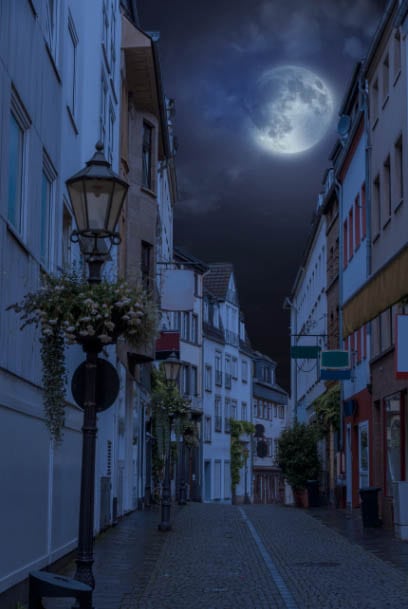
See how the sky is now it’s original color.
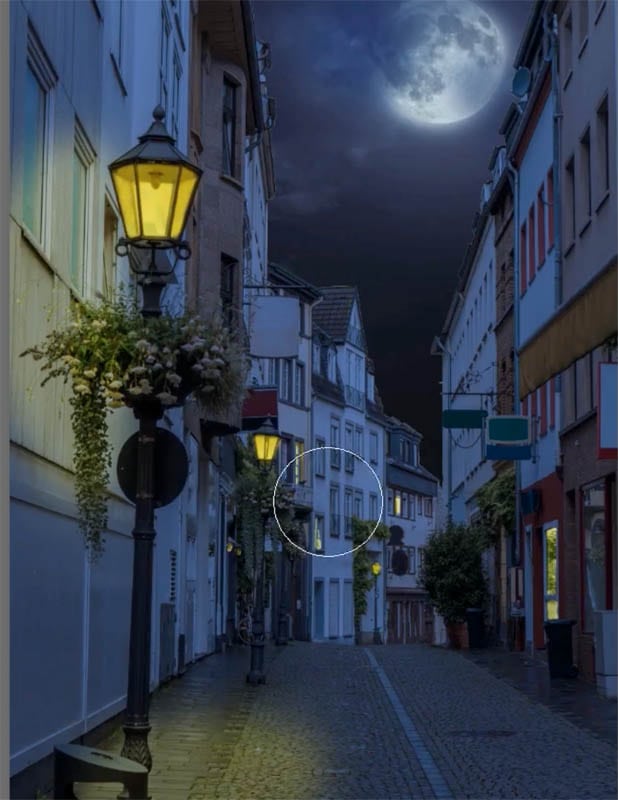
Step 4. Preparing the illumination layer in Photoshop
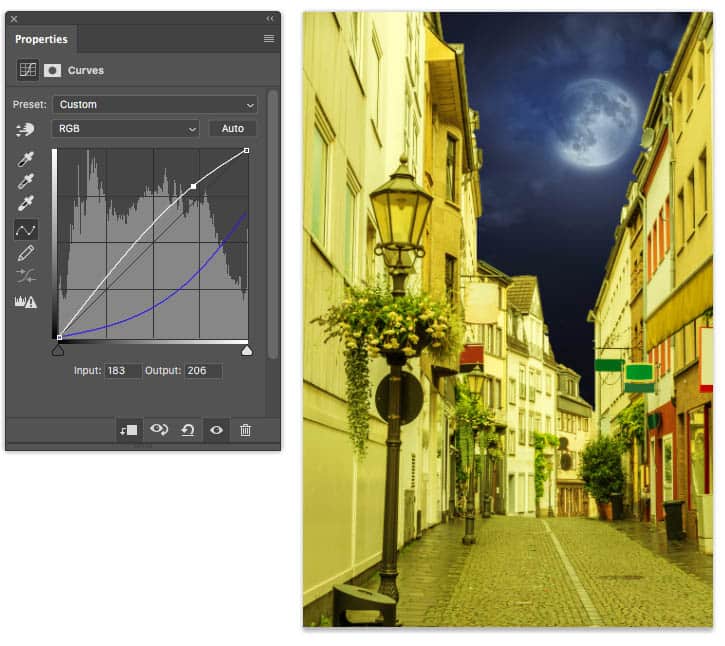
I’m going to let the cat out of the bag, so you know where we are going with this. The adjustment layer is the night scene, we are going to paint on the layer mask to reveal the daytime picture underneath, this will be the street lights and window lights etc, that will make this effect convincing. Traditionally, artificial lights are a little more yellow because they are incandescent. (Increasingly, they are being replaced with daytime balanced LED’s, but I like to romantic yellow color and your viewers will too. Let;s make the scene warmer, or more yellow.
a, Hide the Color Lookup Adjustment layer for now
b. Add a Curves Adjustment layer
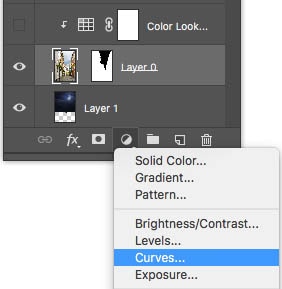
Your Layer stack should look like this (notice that I have clipped the curve also, so we don’t change the sky)
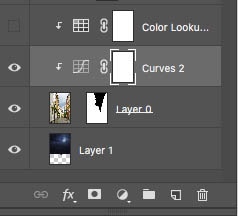
c. Click on RGB to reveal the color channels
d. Choose Blue from the drop-down menu
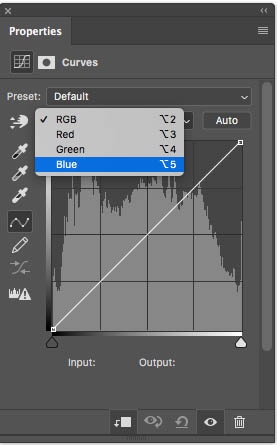
Let’s change the color to a yellow tint. Blue is the opposite of yellow, so we need to reduce the amount of blue.
e. Click to add a point and drag down in the curve as shown here. Also notice I dragged down the highlights on the right side of the curve. It should look nice and yellow now.
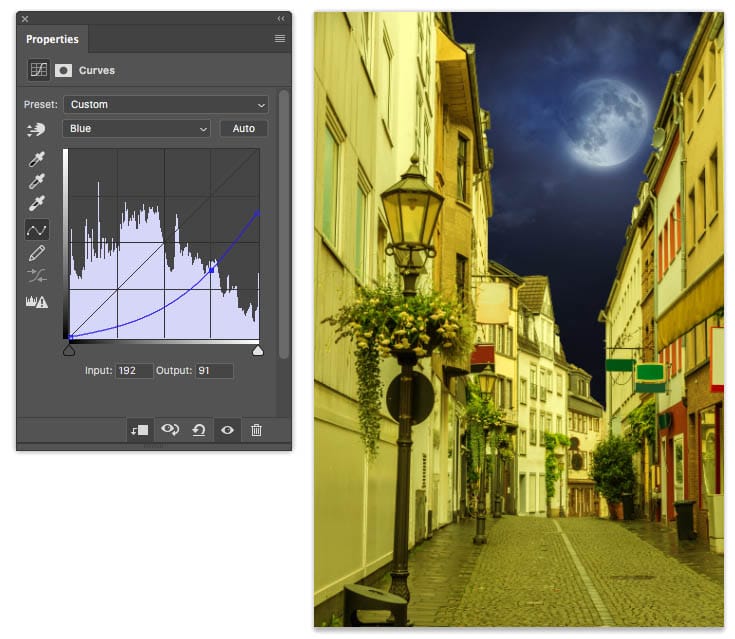
Lets brighten the whole thing up. Click on RGB in the curves, so we are adjusting brightness.
f. Drag up on the curve to make it a little brighter as shown.
One last thing to do before the real fun starts. Lets set ’em up
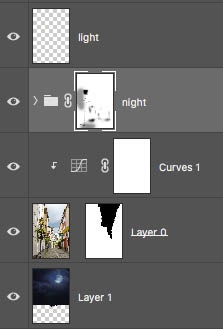
Step 5. Setting up the Layer Masking magic trick
Remember, we will be hiding the night effect with a layer mask to show the daytime underneath. We have to set up the layers in such a way that there will be one mask to rule them all. Here we go.
a. Duplicate the Street layer (Cmd/Ctrl+J)
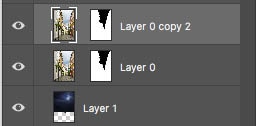
b. Drag the new street layer above the curves layer and sandwich it under the LUT layer.
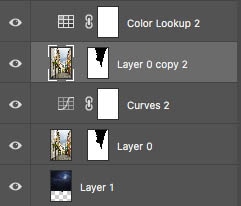
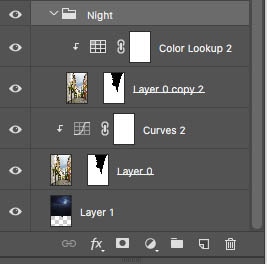
Let’s put the night scene into a group to keep it organized.
c. Ctrl/Cmd+Click on the LUT layer, so that both the street layer and the LUT are selected.

d. Press Cmd/Ctrl+G to group them
Name the folder Night. Good! Almost there
e. With the Night Layer Group selected, go to the top of the Layers panel and change the Blend mode from Pass through to Normal.
(Learn about Layer Blending Modes here)
![]()
![]()
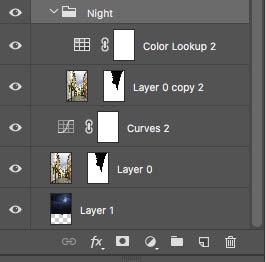
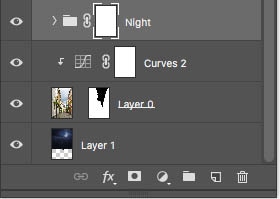
All this moving around, the Adjustment Layers may not be clipping to the layer underneath anymore.
Look at Step 3.b to see how to clip the Adjustment layers (Tip: Move your cursor in the line between the 2 layers, hold down Alt/Option until you see an arrow. Click to clip)
Your Layers panel should look like this. (In the video I made a group for Day as well, that’s fine too. The important thing is that all the night stuff in above the day.
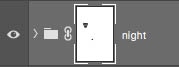
On the Night Layer Group, add a layer mask. ![]()
This mask on the Night Layer group is the key to the whole enchilada.
Let’s test it really quick.
Choose a black brush, set opacity to 100 for now.
Make sure the Night Layer mask is selected

Paint in the image, and you should see yellow where you are painting.
If, yes, then you are ready to proceed.
If no, STOP. Go back over this Step 5 again and fix it. (Remember you can watch the video, and you should watch it first),
Press Cmd/Ctrl+Z to undo your brush stroke.
Brilliant! We have set everything up. Pat yourself on the back!
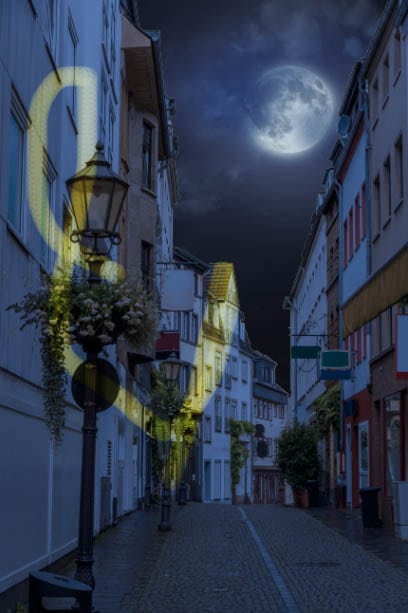
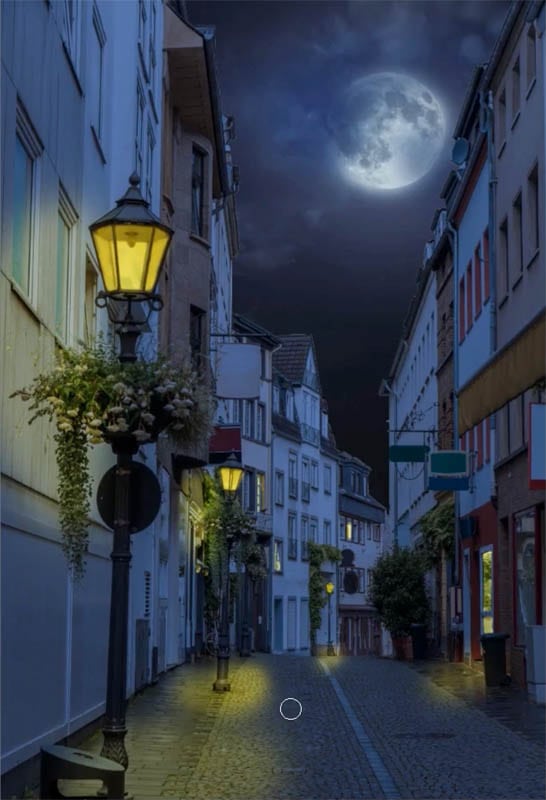
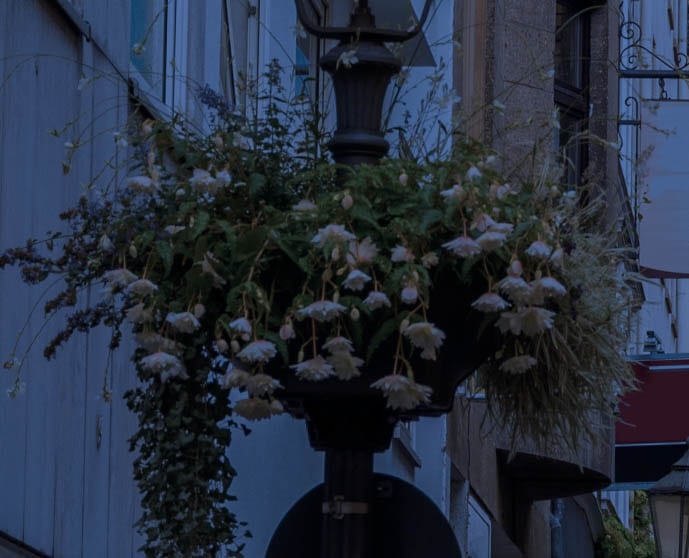
Step 6. Painting Light into a night scene in Photoshop.
Alright, here we go! this is the fun part. We are now going to perform digital magic an paint in light. This is so much fun!
I’ll break it into steps, or basic phases for you.
Part 1. Painting basic Illumination. Turn the Lights on in Photoshop
In this step we are going to paint the light sources only. Look for lights that should be turned on and window light etc.
a. Make sure that your Night mask is selected.
b. Choose a Soft, black brush. Set the opacity to 100%.
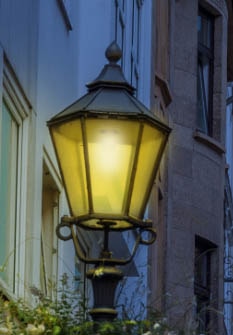
c. Paint into the first lamp. Notice it changes to yellow. (If you go over the lines, choose a white bush and paint the mask away and the blue will come back)

d. Zoom into the image and paint the other obvious lamps. (Isn’t this fun!)
e. Also choose a few windows that you would like to see lit and paint them. Maybe a doorway or two? It’s up to you, be creative and have fun.

Part 2. Flooding the Lights in Photoshop
Once you have painted your light sources, the next step is flood light.
A light will affect the environment around it. It will add pools of light around it, after all, this is a light’s purpose, to illuminate. Let’s simulate that now.
a. Make your brush larger (right-bracket key).
b. Reduce the opacity to around 30% (If you are using a Wacom tablet, set the pressure to Transfer>opacity)
c. Gently paint a pool of light under the street lamp.
d.The light will also affect the wall, paint on that too
 a
a
e. Make your brush a little smaller and do the same thing for the other lights. Don’t forget to add a little glow on the street around the door on the right.
If the ground is wet, the lights will be a bit brighter because of the reflections, if it’s dry, they will be softer.
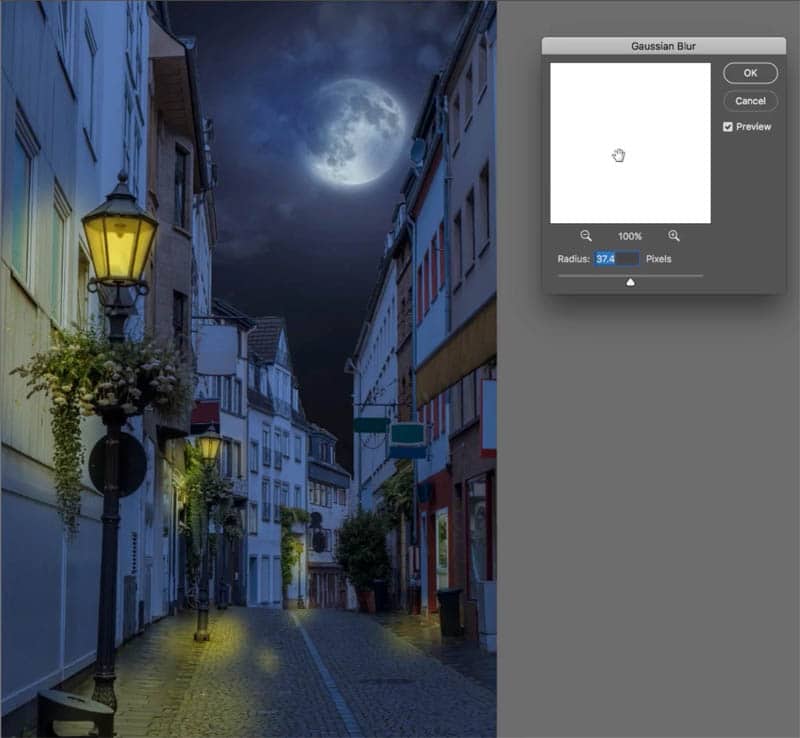
Softening the lights
Now is a good time to soften the light a little, give them a glow. (This also serves to even out your brush stokes).
f. With the mask selected, choose Filter>Blur>Gaussian Blur (Blurring the mask will soften the light)
Depending on the result you want, we will add a different amount of glow. The more atmosphere that would be present makes for more glow. For a foggy night, the number will be higher (eyeball it. If it looks good, it is good). For a crisp night, the number will be lower.
I have chosen 37.
Painting with light in Photoshop | Light Spill and Rim lighting in Photoshop
This is the step that separates the pros from mediocre. Light will define the shape of things as it spills and catches the edges of 3D objects in real life. The process of thought, is exactly the same as dodging and burning, but we are doing it with light at night, light painting. We are adding dimension and shape.
a. Choose 50% opacity on your brush and a flow of around 23 or lower if using a tablet.

Here is a close up of the lamp to demonstrate
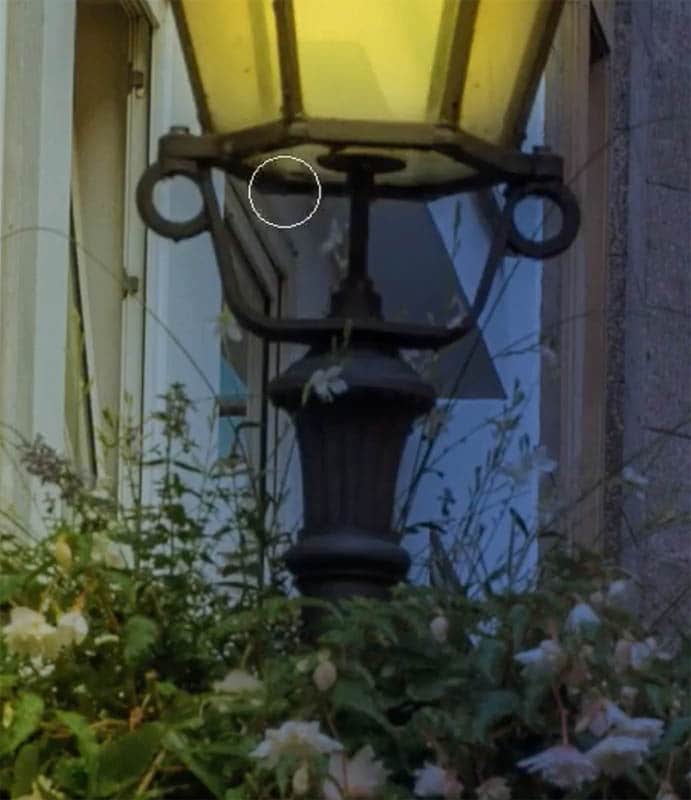
b. Paint around the top rim that is facing the light bulb.
c. Also paint around the bottom rim
See how it is adding dimension and realism?
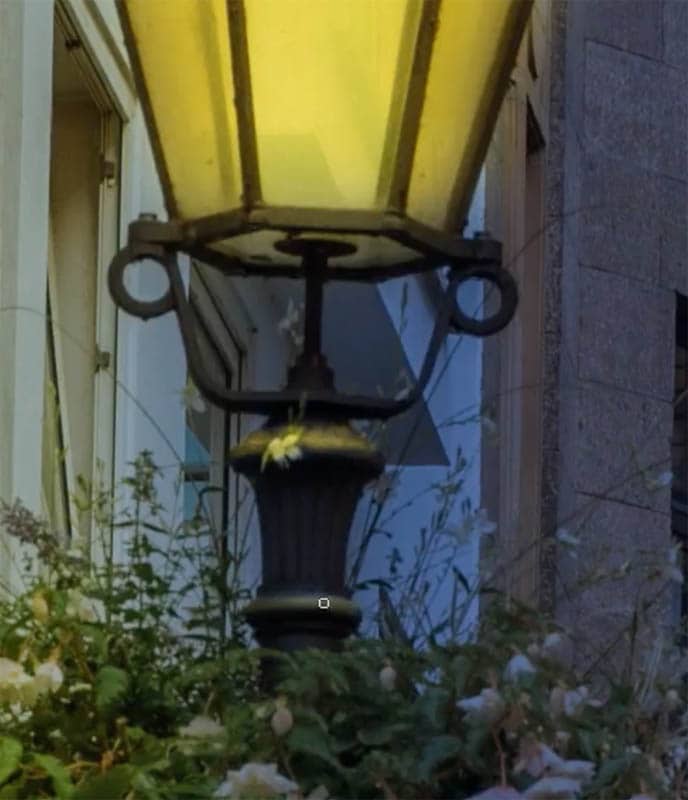
Here is a close up of the foliage under the lamp before any light painting
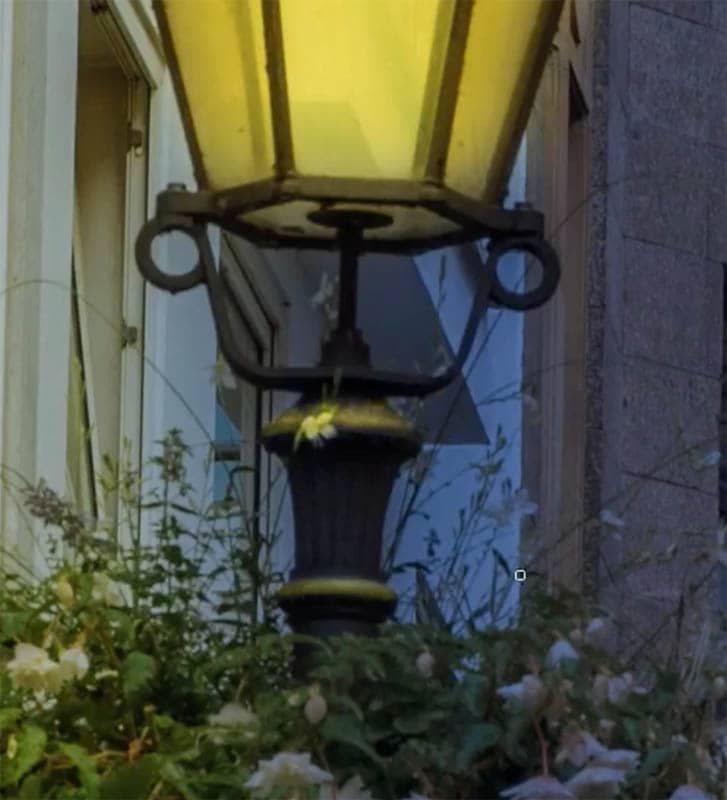
And here is the result after painting with light. Notice that I painted the tops of the leaves and flowers to add depth. This is the step where you can really sped a lot of time, just sculpting the image. I did this fairly quickly, but you can get spectacular results if you invest some real time into it. Please share them in our facebook group so I can see!

d. Look for other surfaces that would receive light and paint them

See how much realism is added?

Adding the Specular light
We are almost there! Once last step is to add the specular light, or the bright part of the actual light bulb.
a. Create a new layer on top and name it light.
b. Choose a new foreground color. Make it yellow, buy very bright, almost white, with just a hint of yellow.
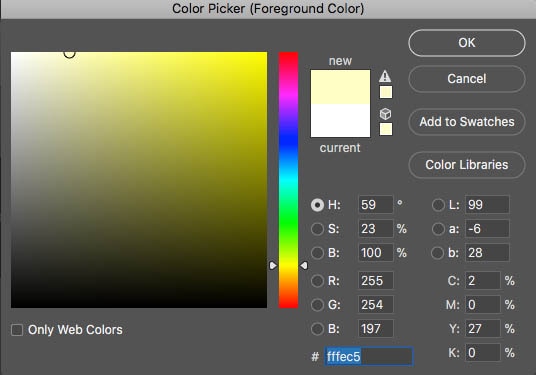
c. Set your brush to 100% opacity and flow.
d. Resize it so that the brush is just a bit bigger than the light bulb.
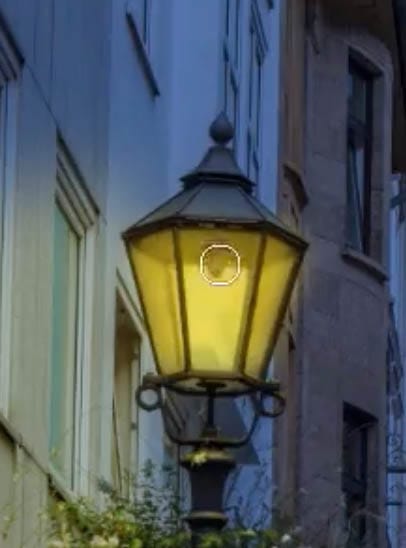
e. Tap with the bush and paint the bright highlight. Now the lights are really on!
f. Repeat for the rest of the light sources.
Congratulations, you have successfully turned day into night! Practice on a few more images and book mark this page for reference.
I hope you have enjoyed this tutorial! Although it was a lot of work for me, I really enjoyed making it and sharing my techniques with you. Please help spread the word, by sharing this tutorial on Social Media!
It was great to see you here at the CAFE, check out my other tutorials!
Colin
PS Don’t forget to follow us on Social Media for more tips.. (I've been posting some fun Instagram and Facebook Stories lately)
You can get my free Layer Blending modes ebook along with dozens of exclusive Photoshop Goodies here

27 thoughts on “How to Turn day to Night in Photoshop Tutorial”
Leave a Reply

How to cut out trees in Photoshop in seconds. This Photoshop tutorial shows you how to perfectly cut out trees...
We will use Channels to help mask out a complex objects with clean edges. This technique will also save you...
How to use the patch tool in Photoshop to quickly clean up smudges and dirt and remove distractions. Difference between...


Outstanding Tutorial. Thank you for introducing me to that Color Lookup –such a great explanation.
Colin, Thank you. That is a beautiful tutorial. Watching you do it and then, the step by step instructions really is the way to teach.. It would be too hard to remember. I really appreciate your educating those of us who are ‘mid- knowledgeable’ students.
Hi Colin, Love the tutorial. I’ve been trying to achieve this look for some time, this tutorial is a vast improvement on the ways I’ve been experimenting with. Thank you.
A side note – the guitar on the wall behind you is a bit distracting, I keep wondering when you might injure yourself on the lever :).
Fantastic Tutorial and you explained it so well, thank you, Colin. It will certainly add some creativity to some of my shots and not just turning day into night. It will be useful for many other things too.
I would also love you to show me how to make dry hair into wet hair. That would be so useful.
WOW!!! What an exciting tutorial. I can’t wait to try this. thank you so much!. You’re the best Colin!!!!
Fabulous tutorial! What a creative way to change day into night! thank you so much…I am so impressed.
love the tutorial
Love this tutorial!! Thanks Colin! I’m definitely going to try it. Years ago I took a photo of some rock structures out east in Arizona (past Apache Junction). I also had taken a shot of my adult nephew. It was broad daylight and I changed it to nighttime with my nephew in it. He was facing the “mountains”. I added eerie lighting (moon off screen) and shaded in some of the crevices in the rocks to look like spooky faces. I also created a ghastly creature rising up out of the ground and heading toward my nephew from a dirt pile nearby. It came out really neat but it was a long drawn out procedure. Wish I had known all this. But then, again, Photoshop CC didn’t exist at that time. It was a lot of fun, anyway.
Great tutorial, like always, and excellent step-by-step explanation. Thanks for all the time you put in
on your tutorials..
Loved it. Funny just today I was looking for a tutorial on how to do a night scene from a day image.
So fun! I can’t wait to try it!
Thank you so much for this, Colin. It looks amazing, and I will definitely try this. I have already experimented with day to night, but this is will be taking it a few steps further.
Thanks Colin. Great tutorial and I really appreciate the written version as well.
Terrific Tutorial Colin,
Thank you for sharing your knowledge.
Fantastic tutorial, that will definitely be tried and used.
Me… like it!!!! 😀 really nice tutorial, Colin. You’re the man!!!!! Is there any way you could show us a tutorial about converting video in photoshop for the web? Thanks.
Very nice tut, learnt a lot of things,,, though cs6 extended, not CC. Thanks a bunch.
I appreciate the tutorial, Colin, especially the step-by-step procedure. I might add one more step, though. After doing the Curves Adjustment layer in which the image is given a yellowish color, go into the layer style which shows the blending options. Then move the left triangle under the “Underlying Layer” bar, either together or separately, to the right until the areas in shadow lose the yellowish tint. I think this makes the image more realistic as they would normally not receive light from the lamps.
Great tutorial – as usual.
Excellent tutoriel d’un très bon effet. Je m’en suis servi en tant qu’animatrice d’un atelier Photofiltre. Bien sûr il a fallu l’adapter, mais j’ai obtenu un résultat très satisfaisant. Un grand merci à vous
Very nice tut, learnt a lot of things,,, though cs6 extended, not CC. Thanks a bunch.
loved it.. love from PAKISTAN
AMAZING!
THANK YOU FOR SHARING….