
New features in Photoshop CC 2015.1 Review and tutorial (Dec 2015)

New Photoshop CC 2015.1 features
Adobe released its latest update to Creative Cloud. This update includes lots of new features in a number of core applications, including Photoshop. We will be discussing all of the new features in Photoshop CC 2015.1 on this page. Read the reviews and watch the video tutorials to learn what’s new in photoshop CC 2015.1
How to force an update to Create Cloud
If you don’t see the updated apps in your Creative Cloud bar, you can force it it to update.
Click on the Creative Cloud logo to open the panel. Click on the gear in the top right corner and choose the option “Check for App updates”. CC will then add the updates to your app panel where you can update them on your desktop. Do you want to update? Yes, you do. There are lots of great new features and speed improvements awaiting you.

Welcome screen
The first thing you will notice is the new welcome screen. This addition will be more of a “welcome” to some users, more than others. It does have some useful features, such as previews of the recently opened images (once they have been opened after the update). This can help if you didn’t name your files well and are looking for something you recently worked on.
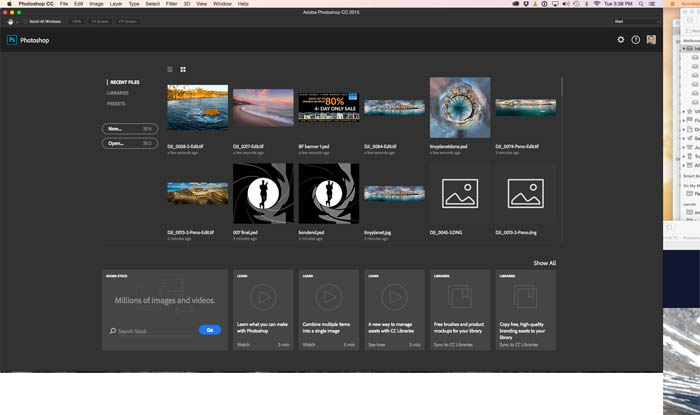
You can also browse your Libraries

You can create a new document from presets.

Personally, I’m not a fan of these screen take overs. Imagine someone saying “Welcome, would you like some music? Are you going to the kitchen or the living room? Should I turn on the TV for you?” This is wonderful the first time, but imagine that EVERY time to step in your front door, even if you just stuck your head out to check the mailbox. But that’s just me, some people will love this feature.
The welcome screen will pop up every time you launch Photoshop, or whenever you close all documents in Photoshop. For those of you who prefer it on your own terms, Ill show you how to turn it off and how to call it when you need it (for seeing recent document thumbnails, which really IS useful.)
How to Disable the Welcome Screen
Go to preferences>General You will see a checkbox for “”Start” Workspace when no Documents are open.” Turn it off to disable it from popping up automatically. You will need to restart for this to take effect.

If you want to see the welcome screen one time.
It’s easy enough to call the welcome screen without enabling it to be on all the time. Close all your documents, so you have a blank Photoshop with nothing open. Choose Welcome from the Workspaces on the top right.
New Interface
I’m sure by now, you have noticed that photoshop now has an updated interface. The world is flat, and Adobe has followed the trend of flat, in the UI design. You can change the darkness or lightness in Preferences, just like before.
Customizable tool bars in photoshop CC 2015.1
Watch the video
On the surface, the UI change looks cool, but the power is under the hood. All the dialog boxes are now dark and match the rest of Photoshop. Yay for that. Even better, you can now customize the toolbar, to show the tools that you want and prioritize them to suit your workflow.
Here are the things you can do with the toolbar
Click the ellipsis near the bottom of the toolbar to open the tool bar customization window.
![]()
Drag tools into the right window pane to hide them from the toolbar. This is a great way to shed all the tools that you don’t use often (or ever). Photoshop can do a lot of things these days! Photographers will probably never use the slice tool and UX designers will probably never need the sponge tool. And no one will will need the Note tool (just joking!), If you need the tools, just drag them to the left pane again to add them back to the toolbar.
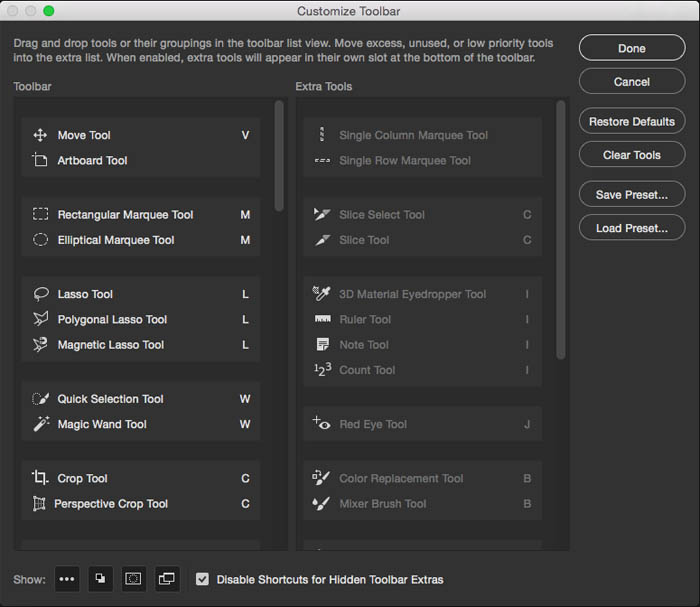
Rearrange the order of the tools, by dragging them on the toolbar. Move whole groups by selecting the edge of their “group box”. You can now move your more frequently used tools to the top.
You can unnest tools by dragging them up or down a little bit. This is a great idea if there are tools you use often such as the dodge and the burn tool and don’t want to have to dig for them. You can also nest tools together by dragging them into a different tool group.
You can also save these different arrangements as toolbar presets and use them later. This is awesome for when you do different tasks and want the tools on hand for those.
![]()
![]()
Tools bars included in workspaces
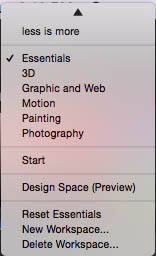
Ok, this is where it gets really sexy! You can assign the toolbar presets to change with custom workspaces. Yes!
Now you can set up workspaces for certain tasks such as retouching, compositing, type, video etc. The panel, menus and the tools you need are on hand, while hiding everything that isn’t needed. We can finally say that Photoshop has a fully customizable interface.
As far as new additions, we could just stop right there and I would be happy! But there is more, much more.
Tip: If you hold your pointer over the customize ellipses, you will see a list of disabled tools that you can select, if you need one in a pinch.

Copy Layers + between documents
Watch the video
Ok, I am really thrilled about this next one. I’m sure you are aware that you have been able to drag a single layer between different documents. First drag up to the document tab, wait for the new window to take focus and then drop the layer into the middle of it.
I don’t know how many times I tried to drag multiple layers over (force of habit) and then realized, that you can’t do that in application frame mode on Mac (normal on windows). So you would go to Window>arrange.. etc and then drag things over. But, no more! Finally, You can drag multiple layers, adjustments layers, Layers with masks, shape layers, Layer styles and other goodness over between windows using the tabs! A little jump for joy on the inside of me 🙂 This will save me so much time!
Library Improvements
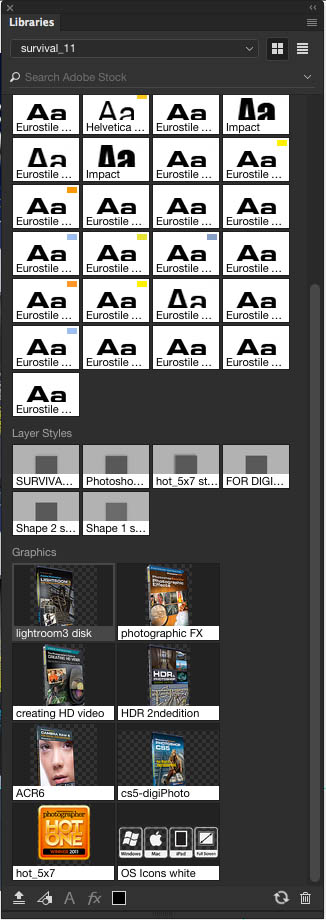
Speaking of drag and drop goodness, Libraries just got a much needed improvement. You can now drag items from the Library panel directly onto layers (or into your document). You can also drag layers into the Library panel! I wish I had sold a DVD for every time I had tried to do this in the past.
You know how you drag and drop anything into a document, and it comes in with the bounding boxes activated, so you can transform and scale the asset, press enter and then proceed. You can skip the transform step now. Go to Preferences and turn off “Skip Transform when Placing” from the general preferences. You can always transform them later, but when YOU are ready, you don’t have to break your workflow to feed a hungry chirping Photoshop.
Suck it up
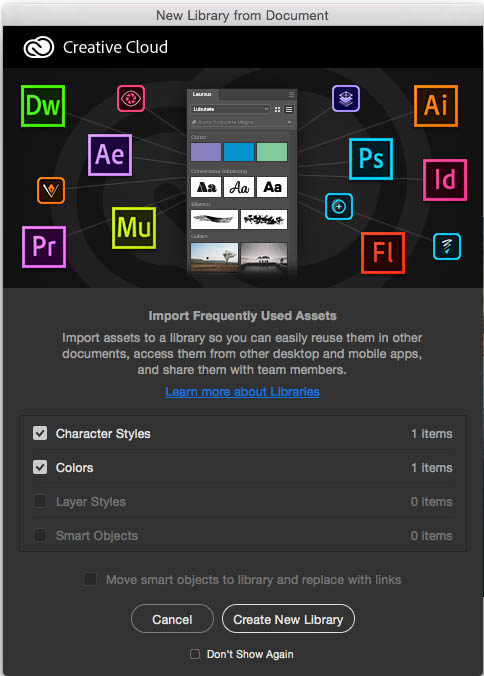
What about when you are working in a document that is branded, such as an ad layout. You are always going to use the same elements, logos, type styles, colors, layer styles etc. Rather than have to recreate them every time, Libraries are great for reusable elements.
Creating a library of styles from a document, can be a lot of work. Not any more! You can have Photoshop do it all in a single click. Choose the panel options menu at the top right corner of the Library panel and choose “Create New Library from Document.” Photoshop will now create a new library and bring in all the elements of the document automatically.


Some people get overzealous at a good thing (I think these were the kids that stuffed themselves with candy at Halloween until they were sick) who thought it would be a good idea to have a nag screen pop up every time you open a document and offer to make a library from it.
No, Adobe, we love you, but we don’t want to nagged, we want to work on our own terms. At the very bottom in the center is a button that is labeled “don’t show again” this will be your friend. (In all fairness, I think Adobe expect you to check this box, they are just very excited and want to make sure you know about this big new feature).

Camera Raw Enhancements
Ok, Camera Raw fans, this is for you.
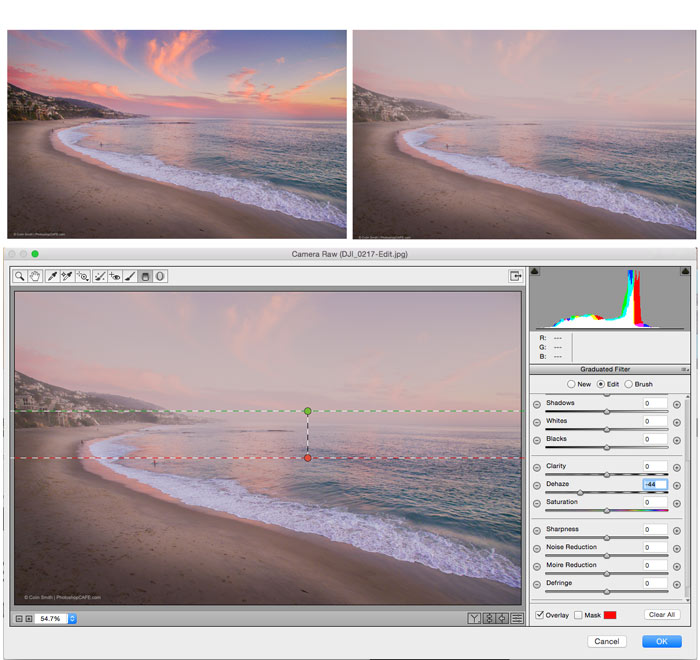
Your Local Dehaze
The dehaze slider is now available in local adjustments. That means you can add it with a brush, gradient and radial tools. I can really see it being useful in the gradient especially to create atmospheric haze. Look for a tutorial on this soon at PhotoshopCAFE, I’m a HUGE fan of atmospheric effects.
Birds eye view
The other addition to Camera Raw, is Birds Eye View.
2 reactions here. 1; “oh”.
Or 2, what the “goalposts, el, double hockey sticks is birds eye view?”
I’m glad you asked so politely, let me tell you.
Those of you who read all my superguides will know of Birdseye view from Photoshop. It’s a quick way to navigate when zoomed in really far. Hold down the h key and click and hold in the view window, The document will zoom out to fit the screen, but a rectangle will be seen in the screen, this is the “zoomed in area” keep holding the h key and reposition the rectangle over an interesting portion of the image. Release the h key and that area now fills the screen. (Yes, you have been able to do that for years in Photoshop, if you didn’t know, I wont tell). It now works in Camera Raw too.

Healing Brush Improvements
All hail the healing brush! And it’s better now. There are 2 new things in the healing brush. The first, when you are painting, you now see the tool working in real-time as you paint. No more, paint, wait and then see the result. This is all thanks to GPU acceleration. The second feature is the addition of the diffusion slider which goes from 1 (none) to 7 (maximum diffusion). This prevents those little smudge marks that the older healing brush sometimes left on the images.
Interface for Surface Pro
If you are working on a Microsoft Surface pro, Photoshop now has a touch interface, like Illustrator has had for about a year. When you snap off the keyboard, the interface buttons are nice and large and pushable with your fingers. There are also Alt, Shift and Ctrl buttons.
Font Features
There are a couple of useful font features. You can now make favorite fonts. Click the star to the left of a font to add it to favs!

At the top of the Font menu, there are filters. Press the star to see your favs
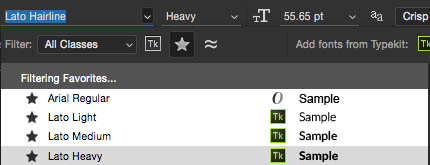
Choose the wavy lines to see similar fonts

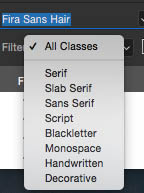
Click on the “class” drop down to filter with things like script, serif and sans serif.
There is also an improved Glyphs panel to help you with alternative glyph sets.
Other things
- The Oil Paint Filter is back
- Design Space, has more improvements for those of you doing UI and UX design, this is very useful.
- The Export feature is now a lot faster and supports sRGB on conversions.
- There are more improvements on the Artboards including artboard specific guides.
Fuse (preview)
Fuse, is an amazing tool that allows you to pose and place 3D characters into your Photoshop compositions. You can even create preset animations and add them to videos! This is such a vast area, I will create a separate tutorial for this. Stay tuned for that soon.
Conclusion
I hope you enjoyed this little review. There are a surprising amount of new features in this release and really useful features! Join the discussion below and add a comment. What do you love/hate the most about Photoshop CC 2015.1 release?
PS Don’t forget to follow us on Social Media for more tips.. (I've been posting some fun Instagram and Facebook Stories lately)
You can get my free Layer Blending modes ebook along with dozens of exclusive Photoshop Goodies here

4 thoughts on “New features in Photoshop CC 2015.1 Review and tutorial (Dec 2015)”
Leave a Reply
How to fix edges on cut outs in Photoshop. Easily Remove edge fringes and halos on cutouts, this technique works...


Worth noting that the new “Start” welcome screen only appears in Application Frame mode, but not when Application Frame is disabled.
Every change in the interface creates smaller, more crowded tool displays that are harder and harder to access, and the changes in the interface design mean everything one has been doing automatically must be refound and relearned. For many years tools were improved without changing the interface, then a new generation in Adobe and Apple had to ‘do something’ and ruined everything. I am an intensive user of GoLive (which I brought to the attention of Fr. Warnock). When they went from 6 to 7 the tools became microscopic on the screen (and I use the biggest cinema display) . I cling onto my G5 with 10.4.11 to use GoLive 6, and FinalCut before it became a bad clone of the bad redesign of iMovie. I own a new very powerful Mac and all that goes with it and never use it because I can do my work better with the interfaces I know and tools I can find automatically.
i used previous version of this software difference is so tiny but nice description.
Still not prepared to rent PS and currently mastering GIMP alongside the previous version. I went from an avid PS supporter for many many years to being very disenfranchised. Disappointing.