
Water splashes and drops in Photoshop Photoshop Tutorial
How to make water splashes and blood splatters in photoshop tutorial.
How to make realistic blood and water splashes in Photoshop
Step 1
Open background image. Here we used 400 X 250 pixels at 72dpi.
Copy this image to your computer or use your own.

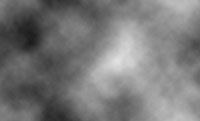
Step 2
Create a new layer. Press “D” to set default foreground and background colors. Filter > Render > Clouds.
Step 3
Filter > Stylize > Find edges.

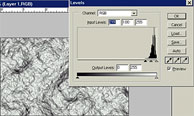
Step 4
Now adjust the levels for more definition in the image: Image > Adjust > Levels or (Mac:Command+L / Windows:Ctrl+L)
Step 5
To create the drops: Filter > Sketch > Plaster. You will have to experiment to find the best settings for your image size and intensity of the effect, here we used: Balance 40, Smooth 14, Light – Top Left.

Step 6
The result should resemble this
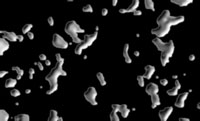
Step 7
To define the edges a bit more: Filter > Sharpen > Unsharp Mask: Amount 500, Radius 1.0, Threshold 0.

Step 8
Select the magic-wand tool, Check the contiguous box on the options bar.
Set the appropriate tolerance setting, we used 10. Now select the background around the drops.
Step 9
Hit the del key to erase the unwanted background. Invert the selection to the drops. Select > Inverse or Mac:Cmd+Shift+I / PC:Ctrl+Shift+I. You should now see the original image and the drops.
If you wanted the image to appear as if mercury had been spilled on it you can stop right here. For the water – proceed…

Step 10
To make the drops look more like water change the layer blending mode to soft light.
We now have an image that looks like water drops on it. But lets have some fun and give it that lens-type distortion typical to real water drops

Step 11
With the drops still selected, click the background layer on the layers palette to activate the background layer.

Step 12
Make the distortion: Filter > Distort > Spherize. 35% (experiment to find what best works for you.)

Step 13
You now have an image that looks like it was left out in the rain with realistic water drops. Play around with it and see what else you can come up with here is a graphic example of blood


One thought on “Water splashes and drops in Photoshop Photoshop Tutorial”
Leave a Reply
Seems like I have had so many people ask how to do a dotted line in Photoshop, so here is...

Learn how to make 4 vintage photo effects in thisPhotoshop tutorial. Learn processing techniques that were historically used and how...

Photoshop Beta Generative Workspace Explained: Prompts, References & Variables


Fantastic tutorial