

Adobe just keeps making the Raw Converter better and better. With the newest version (Adobe Camera Raw 5.0), we now have the ability to locally edit our Raw images! Imagine being able to dodge and burn without using layers, or darken a sky without going even going into Photoshop. The folks at Adobe have conceived a system that allows us to locally edit our images right in the Camera Raw dialog box. Couple this with the use of smart objects and we have more power and control over our photographs than ever before.
 Photographers have been altering their images since the dawn of photography. A little lighting here, some darkening there, changing the contrast of their printing paper, using a filter under the enlarger lens or choosing a longer exposure time. These methods were common darkroom practice. With the advent of digital imaging, these practices have not so much changed as just become easier.
There are two types of changes we can make to our images. Those that affect the entire image (global adjustments) and those that affects only certain areas of the image (Local Adjustments). When you open an image in Camera Raw and begin working with the Basic Tab (Fig. 1.1) you are adjusting the entire image. You are applying Global Adjustments. This is, of course, is the necessary first step. You may add a little exposure to your photo, increase the contrast a touch, or pump up the saturation a bit. These are familiar sliders to those who have worked in Camera Raw before. But what happens if you want to just lighten a face or darken only a sky? You now need to apply Local Adjustments.
There are two new tools in Camera Raw that allow you to work locally on your images, the Graduated Filter and the Adjustment Brush shown highlighted in red in Fig. 1.2. These tools allow you to target a certain area and then apply a change of Exposure, Brightness, Contrast, Saturation, Clarity, or Sharpness to that area only. You can even overlay a color locally with these tools!
![]()
![]()

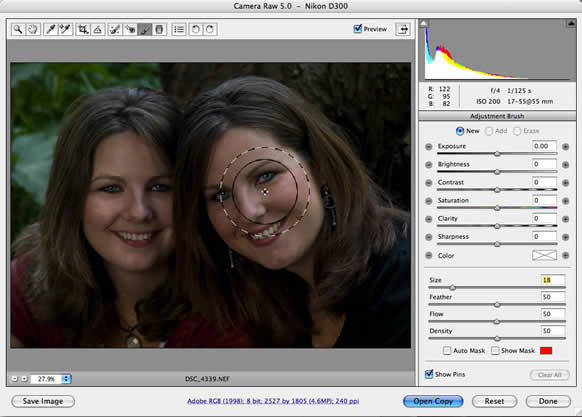
Define what you would like to do the area-add brightness or contrast Then define the area that you want affect.
Step 1 starts with making your adjustments on the right hand panel. I will start by bumping up the exposure to +1.00. At first I will not know how much to add, but we can fine tune that later.
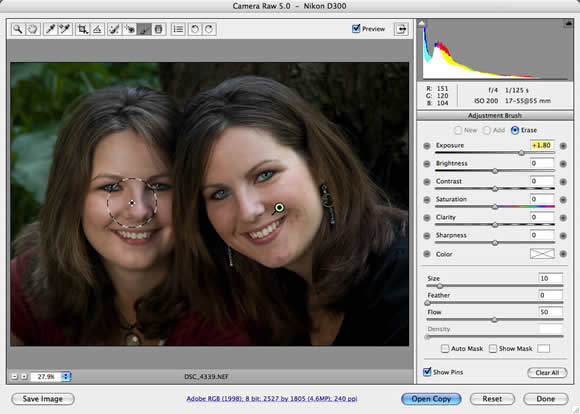
Step 2 simply requires you to paint over the area that you want to affect. The additional exposure is added to that area as you paint. I have increased the exposures slider and finished painting in the other face.
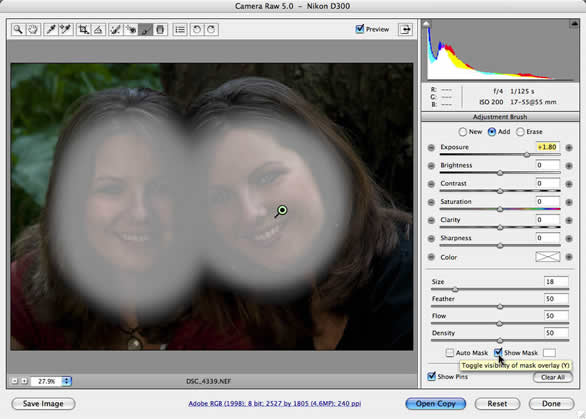
As you define the area, you are actually painting a mask with the paintbrush. By checking the Show Mask box you get a visual of where you are painting as seen in Fig. 1.7. Uncheck the box to remove the mask overlay. To change the mask color, double click on the color box next to the Show Mask box and choose a new color.
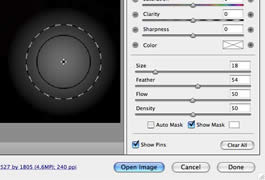
The overall effectiveness of your local adjustment is going to largely depend on how your paint your mask. Fig. 1.8 shows section of the panel that governs your paintbrush as you paint.
Size- Controls the overall size of the brush. For those of you who wish to use the keyboard shortcuts instead, Left Bracket key shrinks the size or Right Bracket Key enlarges the size.
Feather- This determines how soft the brush edge will be. A higher number gives you a softer brush so that your adjustment feathers out, a lower number gives you a harder brush. Fig. 1.9 shows a low feather of 12 and the corresponding mask it creates and Fig. 1.10 shows a high feather of 54 and its mask. Most of the time when painting in a local adjustment, you want your brush feathered. Rarely will you use a hard edged brush.


Flow- This slider controls the rate of application of the adjustment, or how much comes out when you’re painting. A low flow rate will keep building up to the max density you have set in your density slider. Keep this setting at 100 if you are using a mouse and experiment with it if you are using a pressure sensitive tablet.
Density- controls how much opacity there will be total. Keep this setting at 100 if you are using a mouse and experiment with it if you are using a pressure sensitive tablet. If the Density is set to 100, then you get 100% of your adjustment coming through on your image. This is where I recommend beginning. It is easier to paint a 100% density mask and then control the amount of your adjustment through the Exposure, Brightness, Contrast, etc. sliders.
Auto Mask- When checked, this box attempts to control the brush strokes to areas of similar color.
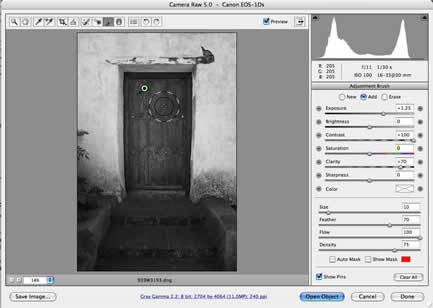
The Raw Converter also allows us to have multiple masks, defining different areas. I have a grayscale image that I would like to fix both the door and the stairs, but each separately. Each area needs slightly different adjustments. I begin by clicking the Adjustments brush. Notice that the new button is checked by default. This means I will be starting a new mask with the adjustments that are currently set.
I set the adjustments to +1.25 Exposure and +100 Contrast and painted in the door. Notice in Fig. 1.12 the small green circle with a black dot in it? This is called a Pin. This Pin lets me know that I am working on the door mask. After painting, the door looks much more alive. The bump in contrast and exposure has brought out more of the details.


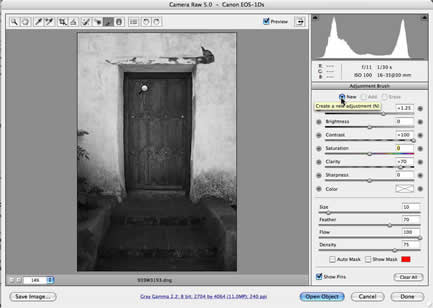
Now to fix the stairs. In Fig. 1.13 I have clicked on the New button. This lets me start a new mask. Notice that my settings have not changed. These settings are Sticky so they always revert back to the last settings used. I will go ahead and begin painting using these settings and then return to them later to adjust if necessary. As soon as you begin to paint, the New button returns to the Add button. So if you stop painting and begin again, you are still painting on the same mask. Fig. 1.14 shows the new mask after it has been painted. Now there is a new Pin. This pin indicates the stairs mask. It now has the black dot in it. The door mask Pin is solid and uncolored. This indicates that it is inactive. Whether I am painting or moving sliders in the adjustment panel, the effects will take place on the active mask-the one with the black center dot. Returning to the adjustment panel I increased my exposure to 2.60 and lowered my brightness to -67 so I would lighten the mortar between the stones without significantly brightening the stones themselves.
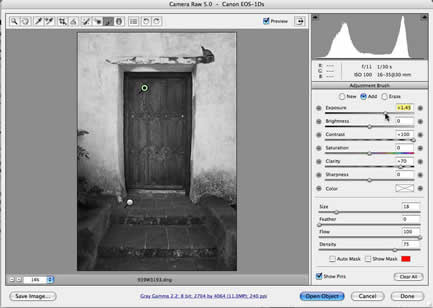
If I wanted to return to the door mask, I simply click on the pin for that mask. The mask temporarily shows, and the pin gets the black dot. Now my adjustments apply to that mask. I move my exposure up to +1.45 to make the door a touch brighter. Fig. 1.15 shows the finished image. To leave the Adjustment Brush mode, simply click on any other tool. Your Local Adjustments are written in to that image and you are ready to proceed with Global adjustments once again. When you are finished editing your image press Done to save your changes and close the file. Press Open Image to open the file into Photoshop for further editing.
Checking the Show Pins box allows you to view the pins (recommended). If you turn this off you might not know which mask you are working on!
When you are working with the Adjustments brush, the preview button turns on and off the local adjustments only. All other global adjustments stay as they were when you entered this area.
Double clicking on any of the sliders, returns them to the zero position.
If all of your sliders are at the zero position, you cannot create a new mask. One of the values must be changed to start painting a new mask.
Check the Eraser radio button and paint to remove the effect from that area (you are removing the mask)
You can paint different densities on the same mask. Begin by painting at 100% Density. If you want to add the same adjustment to other places on the image, but not quite as strong, simply lower the density and paint them in.
Pressing Command+Z (PC-CTL+Z) will undo your last step in working with the Adjustment Brush. Pressing Command+Opt+Z (PC-CTL+Alt+Z) will keep stepping you back in time through all of your edits with the Adjustment Brush.
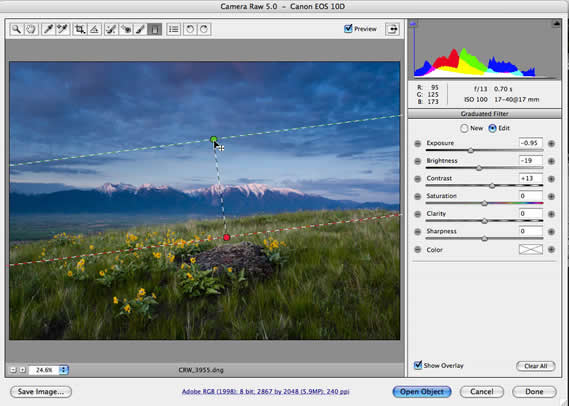
The other great local adjustment tool to find its way into the Adobe Camera RAW 5.0 is the Graduated Filter. Fig. 1.16 shows the Raw box open with Graduated Filter tool selected.
The Graduated Filter tool works very similar to the old Split Neutral Density Filters-except much, much better. This tool gives us complete control over our filter. You can use this tool when you want to darken, lighten, and change contrast or color in a large part of the image. The image in Fig. 1.16 is a perfect candidate for this tool. Here I want to darken down the sky to give it more punch.
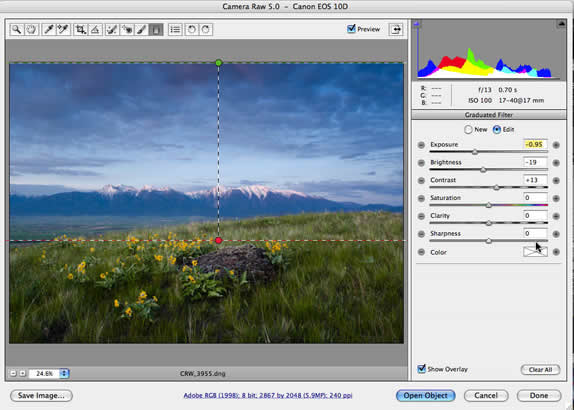

With the Graduated Filter selected, I can see the now familiar sliders to the right. I will use the exposure slider to darken down the sky. I click at the top of the image and start to draw down to the center of the image. This draws out the gradient and reveals the darkening from the lowered exposure. Now I have the chance to readdress the sliders. In this case I lowered my exposure and raised my contrast to get the pop I was looking for in the sky. Fig 1.18. Looks pretty good but we can make it better. The bottom of the gradient does not align with the hillside.

To rotate the gradient, move your mouse over the line of the gradient and push up or down as seen in Fig. 1.19.
To move the bottom line upward click on the red circle and push up.
To move the top line downward, click on the green circle and push down.
Remember that what you are actually drawing is the gradient itself. Everything above the Green circle is receiving the full adjustment, and everything below the red circle is receiving no adjustment at all. The adjustment decreases in intensity from the green line down to the red line. So in Fig. 1.20 you can see that I am lowering my green line so that I am adding more of the darkening adjustment lower in the sky. This has the effect of shortening the gradient. Going too far with this can make your transition zone (gradient) more obvious.
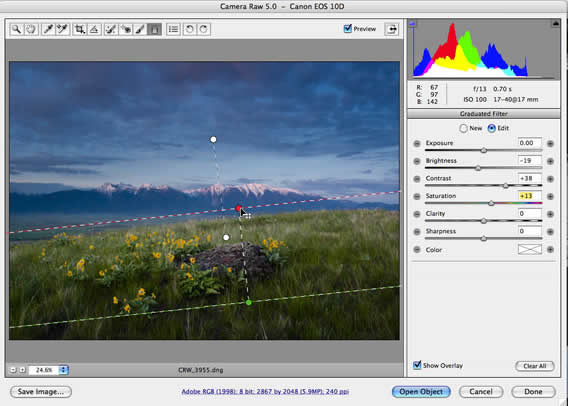
Much like the Adjustment Brush, you can create more than one gradient in your image. Simply click on the new button and draw another. In the case of Fig. 1.21, I will draw a gradient from the bottom up to saturate the foreground and increase contrast. You will notice that your first gradient has mostly disappeared and is now represented by white circles. It is no longer active. This means the effect of it is still present, but you are no longer editing it. The new (active) gradient has the red and green circles. If I made any further adjustments to the sliders, it would apply to this new gradient.
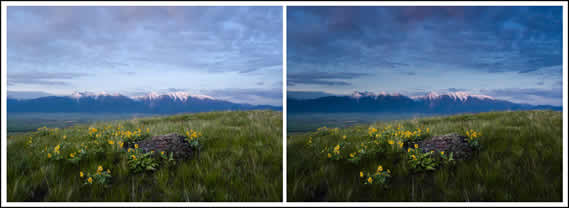
You are free to combine the affects of the gradient tool and the local adjustment tool in one image. In Fig. 1.22 I have clicked on the Adjustment Brush and lightened up the rock a little. I then lowered the density on my brush and painted the yellow flowers. This allowed a little of the lightening through but not 100%. When you are finished editing your image press Done to save your changes and close the file. Press Open Image to open the file into Photoshop for further editing. Fig. 1.23 shows the before and after.
Holding down the shift key while dragging the gradient keeps the gradient traveling in a straight line. It is much easier to do this first. To rotate, move your cursor over the line until it becomes the curved arrow. Now rotate. This gives you much more control. If you decide that you do not like a gradient, while it is active (red and green), just hit the delete key to get rid of it. To activate a gradient when it is displayed by white circles, click on one of the circles. Click the Show Overlay box to hide and show the overlays. It is often easier to adjust the sliders when they are not present. You can pull either the red end or green end off of the canvas to get an even smoother gradient. Double clicking on the color box brings up a box where you can choose a color. This color will be overlaid in the gradient. This can be good when you want to warm up a foreground or add color into the sky. Be careful. Use the saturation slider at the bottom of the box so that your effect is not too garish.
You can use the gradient tool sideways as well! Same technique, just drag sideways. The Preview box only toggles on and off the Gradient effect when you have this tool selected. It will not turn on and off the global settings.
The Clear all button does just what you think it will: Remove all of the gradients you have created.
Pressing Command+Z (PC-CTL+Z) will undo your last step in working with the gradient. Pressing Command+Opt+Z (PC-CTL+Alt+Z) will keep stepping you back in time through all of your edits to the gradient.
The plus and minus buttons on either side of the sliders will move your slider in either .25 or .50 jumps.
Tim Cooper is an author and photographer. He travels the nation teaching Photographers through Rocky Mountain School Of Photography. He is author of the Perfect Exposure and Perfect Composition training videos (PhotoshopCAFE.com)
timcooperphotography.com
This site uses Akismet to reduce spam. Learn how your comment data is processed.
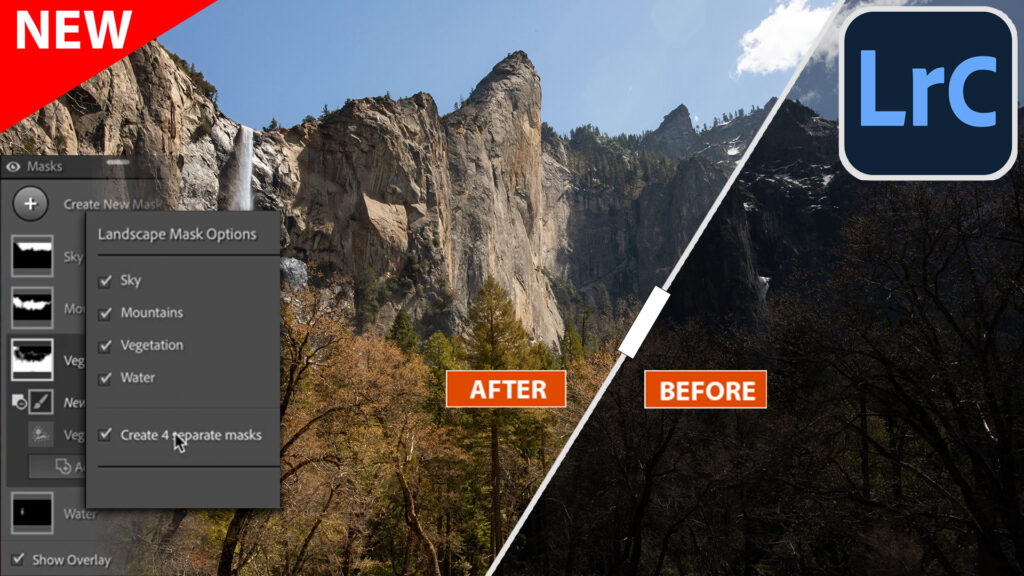
Ai Auto Masks for Landscapes are here in Lightroom and ACR...

Learn new features in Lightroom Classic 2024 aka Lightroom 13 new features...

Notifications


Leave a Reply