
Working with Smart Object and Smart Filters in Photoshop
Working with Smart Objects and Smart Filters in Photoshop.
(How do Smart Objects Work in Photoshop? and 7 tips here) < Newer tutorial
In Photoshop CS2 something called Smart Objects were introduced. These new types of layers allow you to encapsulate things like Illustrator files, PDF (Portable Document Format) and raw files. What’s so cool about this? The Illustrator and PDF files can be updated in Illustrator and the Raw files can be changed in Camera Raw, they never become rasterized layers. Smart objects act like containers that hold the different files. Smart objects take on a new life and are essential for using Smart Filters. Smart filters are like regular filters but they can be re-edited. This is a huge breakthrough that was added in Photoshop CS3, you now have the ability to use filters and change your mind later.
In Photoshop CC, 2 types of smart objects were introduced:
Embedded Smart Objects: Work just like always, these embed the contents within the Photoshop document.
Linked Smart Objects: These work the same way, however, they are linked to an external document. The advantage to this is, if you update the linked object, the PSD will automatically update to match. This is useful for many PSDs that contain the same object such as a logo. When you change the linked object, the change will be rippled through all the linked PSD’s without having to open and update each one.
How Smart Objects work
Smart objects work like containers. All the different items can be placed inside the container. The container can hold various things such as:
Multiple Photoshop Layers
Illustrator vectors
PDF
Raw files
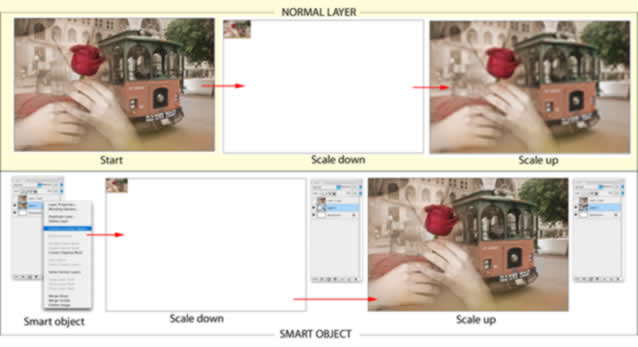
You edit the box much like you would a layer. You can change the blend mode, add a layer mask, add filters, change the layer order or resize. There are some limitations to Smart Objects. You cannot paint directly on them or distort their shape. Actually you cannot directly edit the contents of a Smart Object.
You double click the Smart object in the Layers palette to access the contents of the object. If it’s a vector or Raw file; Illustrator or Camera Raw will be launched to make the changes. Make the changes and then choose File>Save. The Smart Object will be updated. Smart objects aren’t limited to outside file types. You can place a layer or group a series of layers into a Smart Object. When you edit Photoshop layers, a separate document window will open with the contents of the Smart Object. This document will look and function the same as any other Photoshop document. You can freely edit the contents just like any in Photoshop. When you have finished, choose close, and then save. The contents of the Smart object will be updated.
If you want to know more about Smart Objects, check out my Photoshop Smart Objects, Ultimate guide.
Thanks for looking
PS Don’t forget to follow us on Social Media for more tips.. (I've been posting some fun Instagram and Facebook Stories lately)
You can get my free Layer Blending modes ebook along with dozens of exclusive Photoshop Goodies here


4 thoughts on “Working with Smart Object and Smart Filters in Photoshop”
Leave a Reply

Learn exactly how Adjustment Layers work in Photoshop in 4 steps that are packed with little-known tips and tricks. Your...

5 really useful tips that will open new features in Photoshop, check out these Photoshop CC tips that will help...

Lightroom just got an update and one of those updates is the addition of 2 new ai masks.


Difficult to understand…
Great information and technique.
Hey, Colin, have you a tutorial that shows how to blend random objects onto a model and create say an avant garde outfit using everyday objects?
Great Photoshop tutorial. Brilliant for learning. I great more idea to your post but if your create a video tutorial that,s best for us.