
How to make greeting cards in Photoshop | the ultimate guide, free smart templates included
Create Your Own Greeting Card in Photoshop
Learn to create stunning designs in Photoshop, with this course
Designing Flexible Greeting Card Templates in Photoshop
Creating your own greeting cards in Photoshop doesn’t have to be a one-off project. With a little planning, you can build a reusable template that works for birthdays, Christmas, thank-you cards, and more—no step-by-step memorization required.
This guide will help you understand the structure, logic, and best practices behind a solid greeting card template, so you can adapt it to any design you want.
Understanding Fold Types and Layout
Before you touch Photoshop, it helps to think in paper.
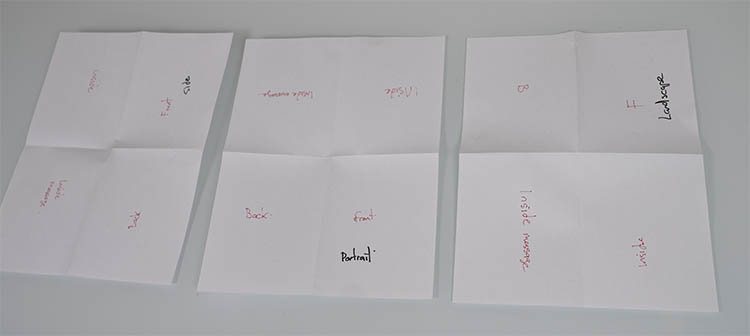
Take a standard 8.5×11″ sheet and fold it into quarters. By changing the way you fold it, you get different card styles:
-
Landscape side-fold – card opens like a book, horizontally.
-
Landscape tent-fold – card stands like a little tent.
-
Portrait side-fold – tall, traditional “book” card.
The easiest way to remember the orientation and position of each panel, is to make a mock up on plain paper.
Take blank paper and fold into quarters for each style of card. Write on each panel (front, back, inside message, inside panel) and mark which way is “up.” This physical mockup becomes your reference for how the digital layout should behave once it’s printed, trimmed, and folded.
The key idea: every card is just one flat sheet divided into four panels—you’re simply changing which direction each panel will face when it’s folded. Not, you only have to print on a single side of the paper to make a card that is decorated on every visible surface.
Building a Reusable Photoshop Template
In Photoshop, you can recreate that quartered sheet as a flexible template:
-
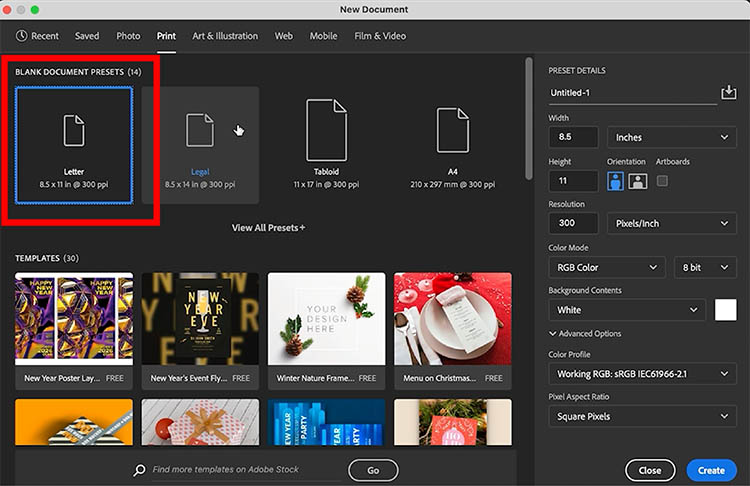
Choose File>New and Start with a letter-sized document at 300 ppi for print quality.
-
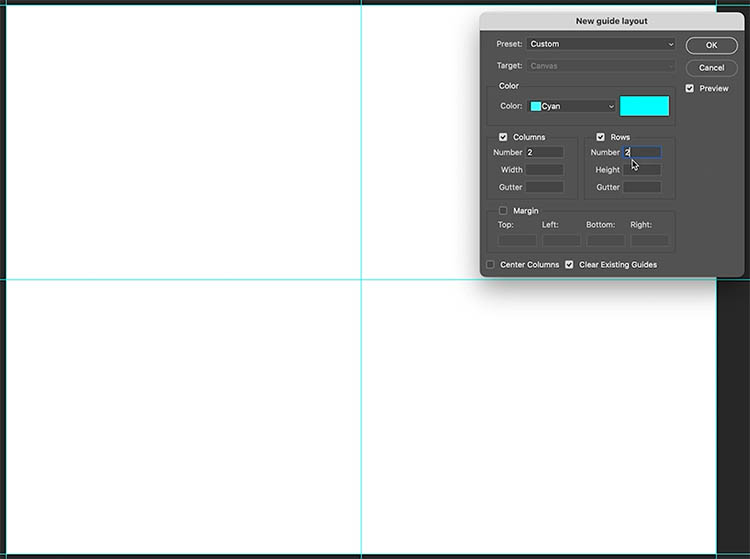
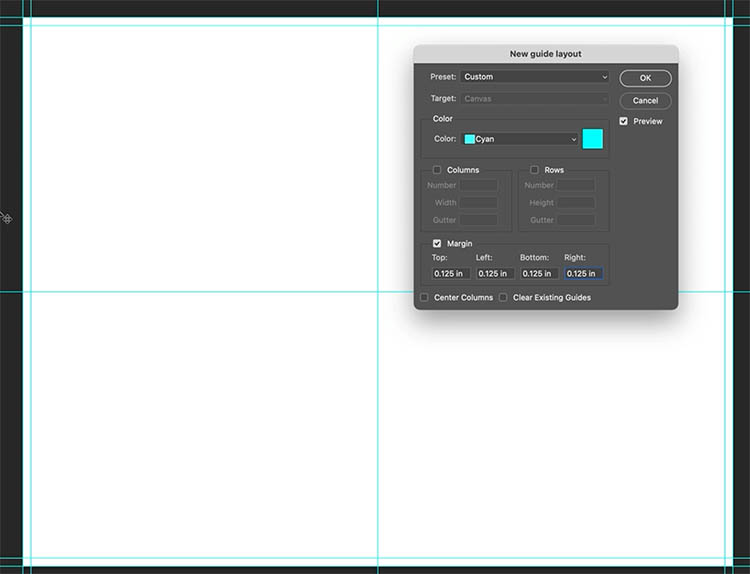
Use guides to divide the canvas into four equal panels (2 rows × 2 columns). Photoshop can make the guides for you. View>Guide>New Guide Layout
-
Add a small bleed (for example, 1/8″ is industry standard in the US.) inside the edges so artwork can extend beyond the trim line.
- You can include this in your guide layout, or create an additional one and choose .125 in (for 1/8th of an inch).
The bleed ensures that when the card is trimmed, you don’t get thin white lines around the outer edge.
If your printer prints right up to the edges like some Epson printers, you won’t need the bleed.
You can also create crop marks on their own layer—short lines that mark where the paper should be trimmed after printing. This is especially helpful if your printer doesn’t print to the absolute edge of the page. The video at the top shows how to make crop marks.
Tip: Keep crop marks on a separate layer so you can hide or show them depending on where you’re printing. I also lock this layer, so it can’t be accidentally moved.
Using Smart Objects for Each Panel
The real power of the template comes from using Smart Objects for the panels.
Each panel—front, back, inside, and inside message—can be its own smart object. That means:
-
You design right-side up inside the smart object.
-
The main template handles the rotation and position for you.
-
When you update the content of a smart object, the panel updates with it.
Make the panels
-
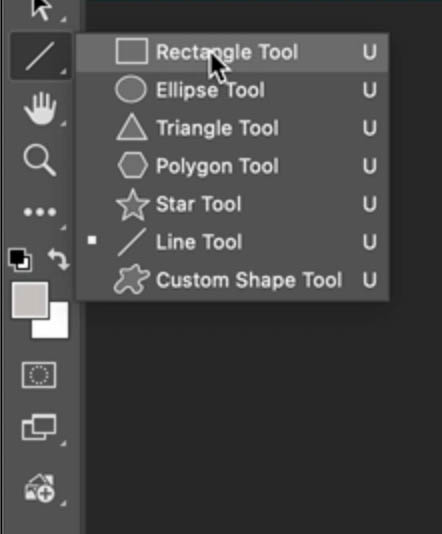
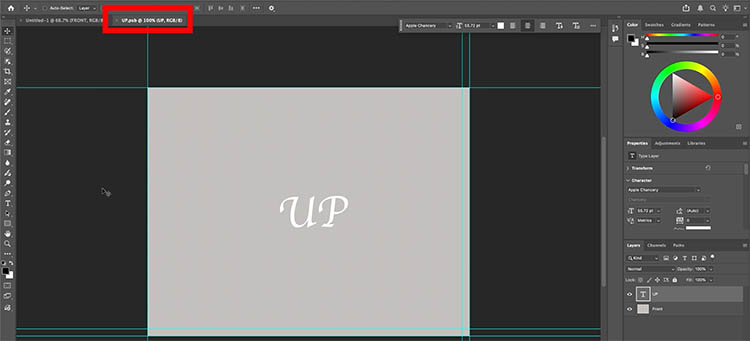
Choose the rectangle tool and create a new layer.
-
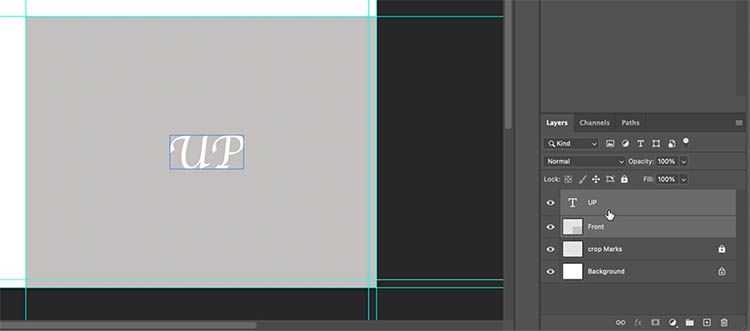
Make the rectangle cover the front panel.
- Set the foreground color to gray.
- Fill the rectangle with the foreground color Alt+Backspace / Option+Delete on Mac
Add some text that says UP, so you know which way should be up.
-
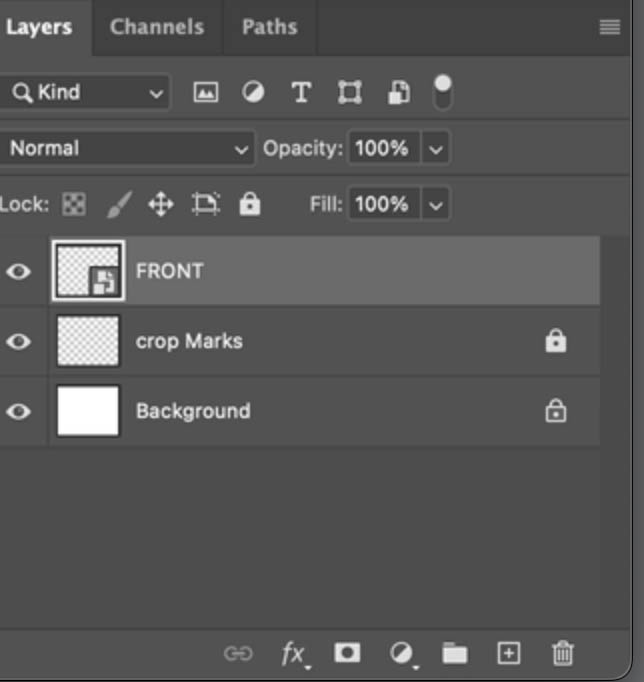
Convert it to a Smart Object. Select both Layers and Right-Click in the layers panel. Choose “Convert to Smart Object”.
- Name the Layer “Front”.
-
Let’s create the other panels.
-
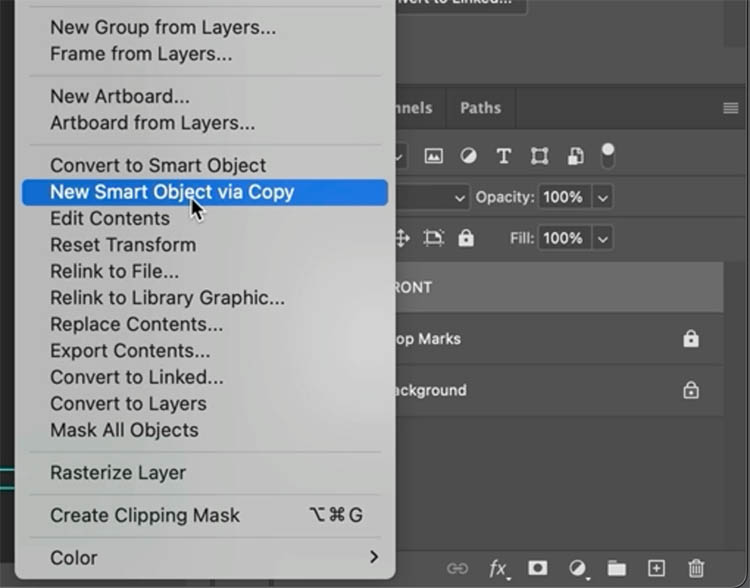
Duplicate the smart Object by Right-Clicking on the layer and choosing New Smart Object via Copy so each panel can have independent content. If you duplicate the Smart object other ways, (such as Ctrl+J) it will make a child of the smart object and won’t be able to have its own separate contents.
Position the Panel
Repeat for each panel
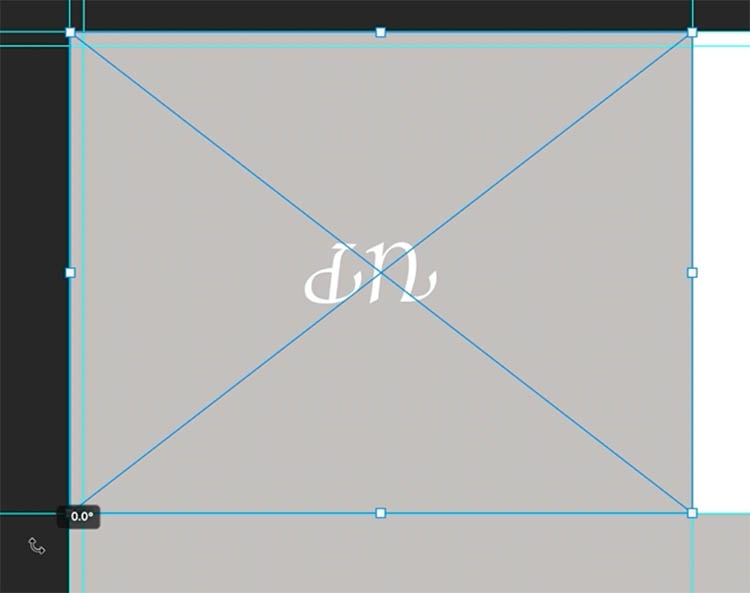
When you want to make a panel upside down, first create the smart object. Then Press Ctrl+T for free transform
Drag on the corner to rotate it. Later: when we are working inside this smart object, we will be able to design the right-way up and the smart object will rotate it for us.
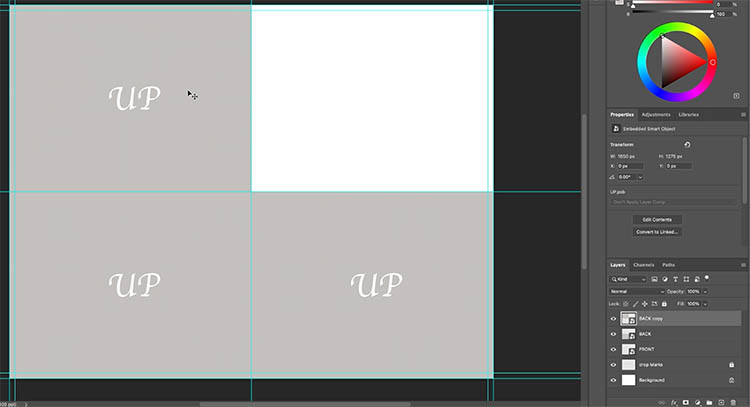
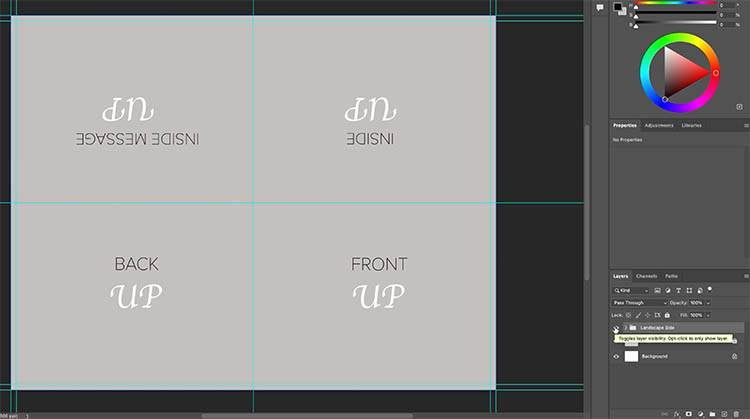
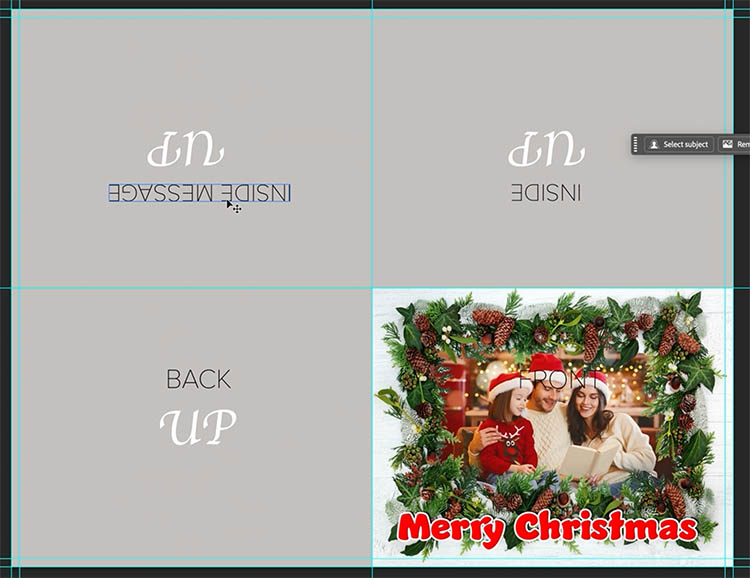
Here is the final layout for the card. You will see this in the template.
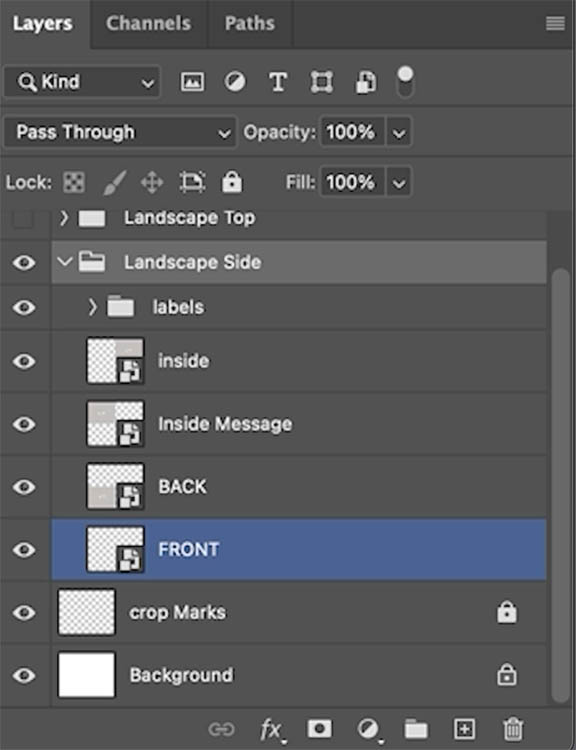
Choose all the layers for the panels and then Press Ctrl/Cmd+G to put them in a group.
Make new layouts for each type of card orientation:
-
Landscape side-fold layout
-
Landscape tent-fold layout
-
Portrait side-fold layout
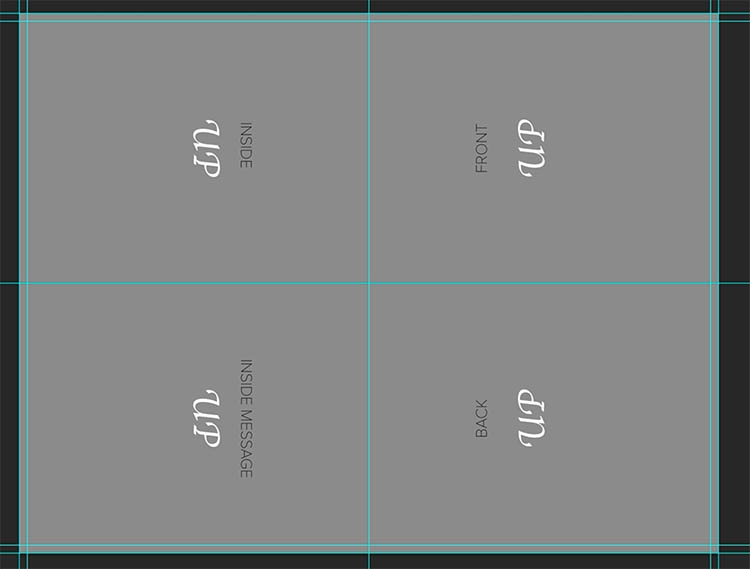
Label each group clearly (e.g., “Landscape Side,” “Portrait Side,” “Landscape Top”) and keep a “labels” layer that names each panel: front, back, inside, inside message.
You will hide the labels layers before you print, so they don’t show on the card.
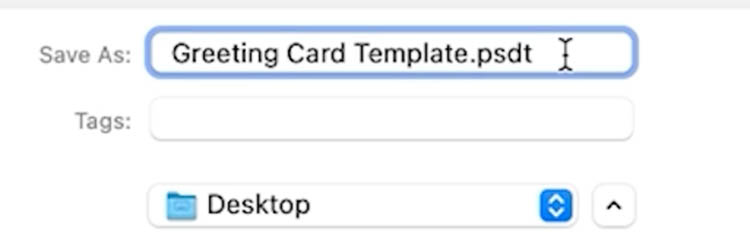
Save this whole setup as a PSDT template so you never overwrite it. Every time you open it, Photoshop forces you to save as a new file—protecting your master template.
To do this, simply save as normal (File>Save as). Save as a PSD and then manually type a “t” to the end of the extension. Change .psd to .psdt and press save.
Designing a Greeting Card From the Template
Once the template is set up, you can design the card.
If you are working from the included template, this is where you will start.
Once the structure is in place, designing a card becomes pure creativity.
Open the template and:
-
Choose the layout you want (for example, landscape side-fold) and hide the others.
-
Double-click the smart object for the front panel.
-
It will open as a new document. Design it like any standard document. (When you press Ctrl+S it will update the contents of that panel).
-
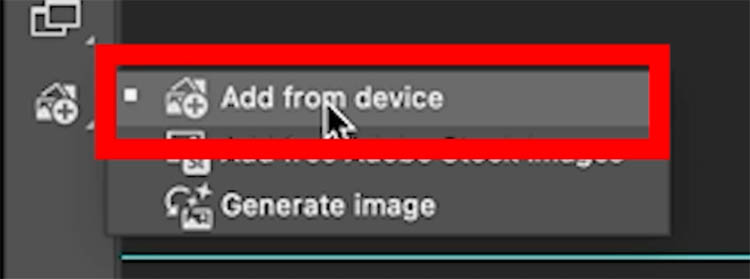
Drop in your own Photo by clicking the + icon, at the bottom of the toolbar and choosing add from Device.
- Navigate to the photo you want to use from your computer.
You can also add design elements and image from the free Adobe Stock collection. Choose Add Free Adobe Stock Images from the menu and search and browse the collection., This is shown the video part of the tutorial.

-
Add decorative elements like mistletoe or ornaments.
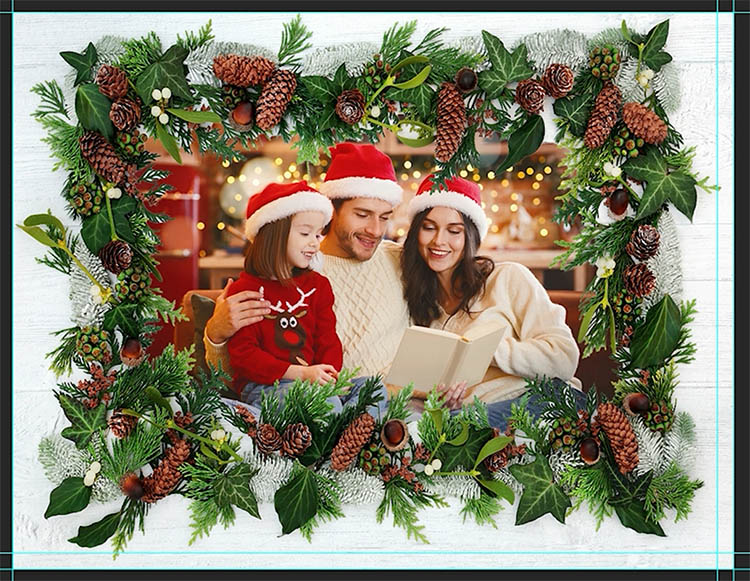
-
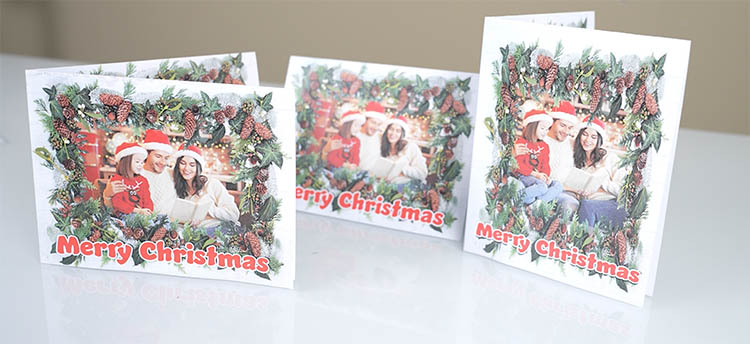
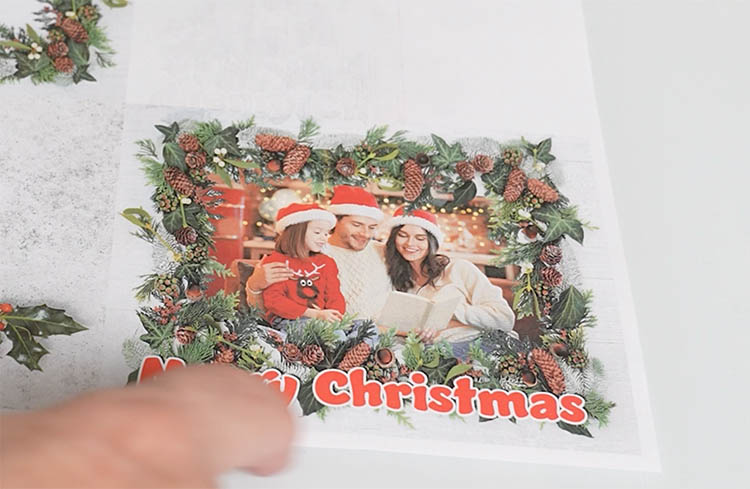
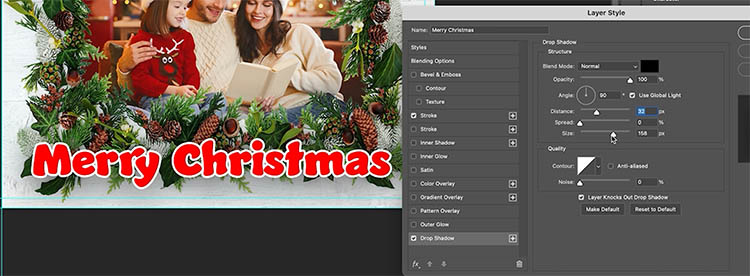
Add text such as “Merry Christmas” with color, stroke, or drop shadow.
When you save the smart object, the main template updates automatically—placing your design exactly where it needs to be on the flat layout.
The inside message panel can hold a textured background (like parchment), a simple greeting, or just space for handwriting. The back panel might stay minimal with just a logo or small line of text.

Design each panel by first double clicking the smart object to open in a new window. Always design within the smart object documents and then save. This way it will be really easy to organize.
Preparing for Print
When you’re happy with your design, you have a couple of options for printing:
-
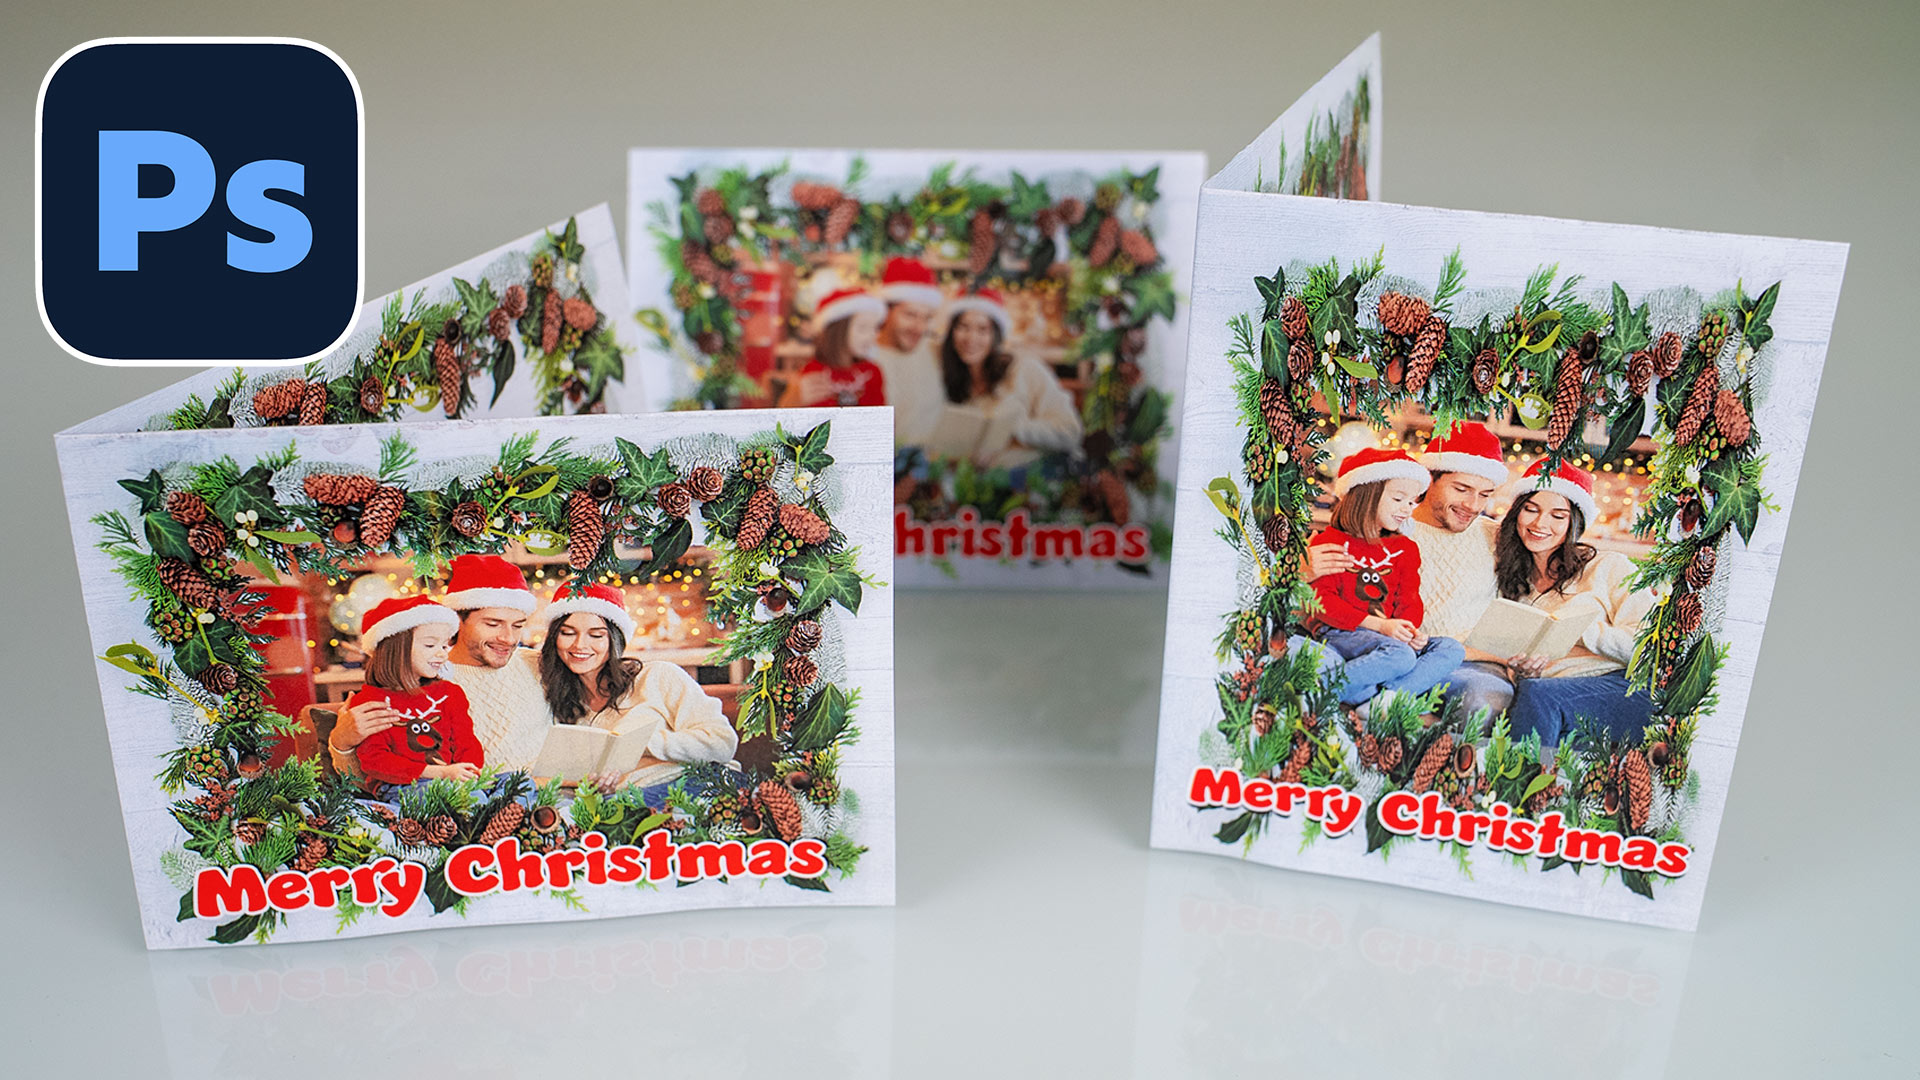
Print at home on heavier stock (for example, a light card or thick matte paper).
-
Export a JPEG or similar file and take it to a print shop.
If you’re exporting:
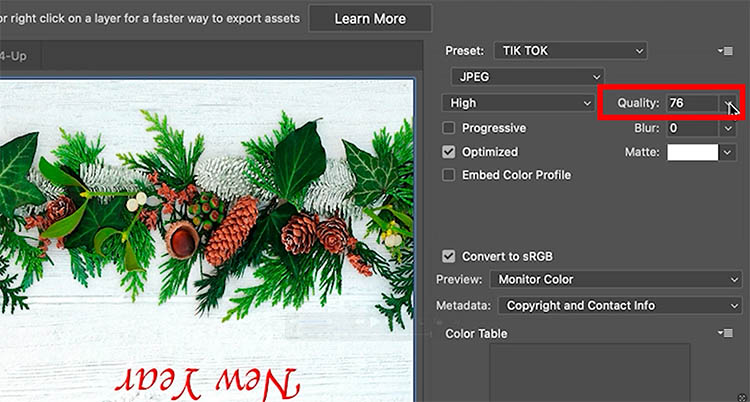
Choose File>Save For Web.
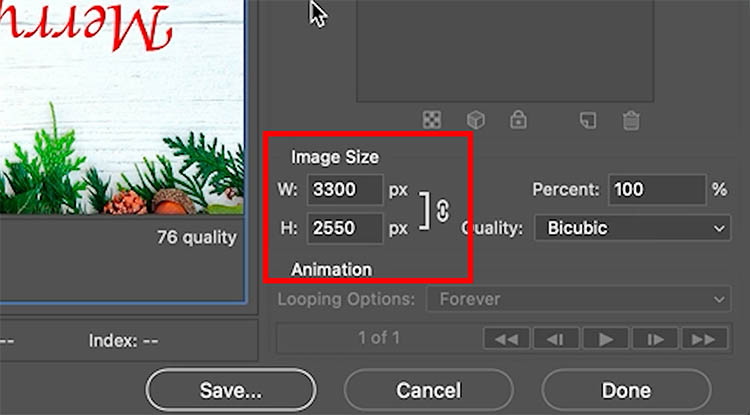
Choose JPEG at full size and around “75” quality is usually sufficient.
Printers that don’t print to the edge (like many office printers) will benefit from your bleed and crop marks—you’ll print slightly larger and trim on the marks to get full-bleed color.
If your printer does support borderless printing, you can skip the crop marks and bleed trimming and print straight to edge.
Tip: Lighter paper stock can struggle with “tent” folds standing up; side folds are usually more stable unless you’re printing on stiffer card.
Final Thoughts
Once you understand how the four panels relate to each fold type, a single Photoshop template can be reused for endless occasions—Christmas, birthdays, thank you cards, weddings, and more. You design inside smart objects, the template handles the layout and folding logic, and you keep all the technical bits (bleed, crop, safe area) built in.
What kind of greeting card would you design first with this template—holiday, Christmas, birthday, thank you, or something totally different? Let me know in the comments.
It’s great to see you here at the CAFE
Colin
PS Don’t forget to follow us on Social Media for more tips.. (I've been posting some fun Instagram and Facebook Stories lately)
You can get my free Layer Blending modes ebook along with dozens of exclusive Photoshop Goodies here

15 thoughts on “How to make greeting cards in Photoshop | the ultimate guide, free smart templates included”
Leave a Reply

Learn how to use the Radial tool to create ovals of any size, angle and shape in Adobe Lightroom. This...

How to get much better results with Generative Fill in Photoshop
New Enhance Detail in Photoshop gets better resolution using Generative Fill and Generative Expand


Wow, really useful guide to creating a brilliant template for cards. Thank you Colin and a Merry Christmas!!
Thanks Ralph, glad you liked it
Terrific Colin. Yes please. More of these practical tutorials. I learn more re the PS tools and their associated tips/shortcuts through these practical use illustrations than through the more theoretical lessons.
Similarly, I really miss the Fix Your Photos tutorials which were of practical use but gave really great everyday tips.
Thanks for the feedback. Once we get back into a “monthly” livestream, maybe we can bring that back.
Uitstekend!!!!
Thanks!
Very timely. Exceptional instructions. Thanks for the template. Have a Merry Christmas Colin, Jim
Oh, man, Colin! Where were you when I needed you about 18 years ago?? I broke my heart and completely lost my mind (such as it was) figuring this out so I could make my first cards with Photoshop. Lovely write up and I know it will be worth gold for those designing and printing their cards. And thanks for the template!
More than happy to help, I figured someone would find it useful this time of the year 🙂
Great tutorial but cant get he templates. Will keep trying. Thanks
Brian
I don’t know why, all you need to do it click the link to download the template, I just tested it and it works fine, maybe try a different browser, or just check your downloads folder, maybe its already there and you didn’t see it?
Thanks for the information and step by step instructions. But Colin, not everything is mistletoe! The last one was holly.
lol, I’m not good on plants and fauna
Thank you so much for this tutorial and the wonderful template!! Have been using it since Christmas, it is great for the birthday and thank you cards!
I’m happy you found it useful!