Photoshop Compositing: Sky City Project. Photoshop 2025
$39.99

New Version for Photoshop 2025:
If you have ever wanted to learn about working with layers, masks and compositing in Photoshop, this is what you are looking for. In this video training, you are going to follow along, step-by-step as Colin builds a real-world compositing project with you. The great thing about a project is that nothing is skipped in the workflow. This is where you put together everything that you have learned about Photoshop.
You will learn how to combine different photos together to create a piece of art in Photoshop. You will learn different ways of extracting photos from the background and how to seamlessly blend them all together. You will learn how to add atmosphere, and cinematic coloring and implied lighting.
We begin by combining photos to build up the background plate. You will do some very basic matte painting techniques to add a personal touch (anyone can do it with the supplied brushes). We will then retouch and extract the model from her background. Finally we place the model into the scene and add a color look to complete the piece.
Throughout this step bt step training you will learn tons of techniques, tips and secrets to get the work done quickly and easily with pro level results. This is the skills that you can actually use whenever you are in Photoshop. Recorded in Photoshop 2025
NEW: Written 32 page PDF Workbook INCLUDED!
NEW: Photoshop 2025 VERSION
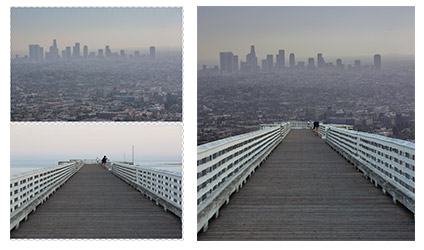
Combining photos
You will combine different photos together, mask them and seamlessly blend them to create a background plate to serve as the base for you composite. Learn how to use the Pen tool to make clean selections.
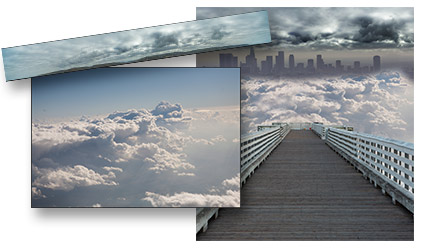
Adding clouds
Drop in the photos of clouds. This is where you will use Layer masks to seamlessly build up your clouds. Use cloning to add some randomness and shape the bank of clouds.

Making the city
Take the existing city and extend the buildings and transform it into a futuristic sky scraper metropolis. Blend the buildings in with the clouds and do some touch ups with simple digital painting.

Making the city Adding the sun
Using blending modes, drop in the image of the sun. Then make the light that comes from the sun affect the rest of the image. You just added a light source! Let’s make it look real with blending modes and a lens flare.

Adding Dimension
It’s time to make shadows and highlights to add emphasis and digitally set the lighting. Use creative Dodge and Burn to shape the objects and add dimension to make things pop.

Image clean up
Take the image of the model into Camera Raw and bring out the shadow and highlight detail.

Extract and place
The model is in the house! Cut out the model from the background and place the photo into the scene. You will learn how to use Select Subject and the Select and Mask Workspace, to quickly cut out a person and place them into a different background.

Adding dimension and drama
Let’s do some dodging and burning (Paint with Shadow and Light)l. Make the flat image look 3D and add some mood and drama to the image. You will love this quick, non destructive method of dodging and burning, that is a little different than what you are used to and it’s super quick!

Painting clouds with the included Cloud Brush
Load up the cloud brush and begin to paint in clouds and smoke to add a lot of atmosphere to the image. This is one of my favorite parts.

Creating the Look!
This is where you add your personal touch to the image and make it look cinematic, comic book. movie poster or video games style.
$39.99


Jerry Keenehan (verified owner) –
This is a must-do tutorial for anyone aspiring to become proficient with Photoshop. I’ve completed a number of Photoshop tutorials and so am familiar with the basic tools and techniques. However, there are so many nuances to every one of the Photoshop tools that only by repitition and continued learning exercises can you ever hope to become truly proficient – not ‘an expert’ – but what most of us are aiming for – “proficiency” with the basic Photoshop tools for our personal projects and/or professional skills.
Colin’s SkyCity project is a wonderful and rewarding exercise to refresh those Photoshop skills and learn new ways to apply them. This is one of the best project-oriented PS tutorials I’ve come across and is complete with all the downloaded components you need to follow along and then repeat the project on your own to burn in the lessons learned.
Well worth your time and bucks for this tutorial. And big thanks to Colin for all of the free tutorials and tips he continues to send out to Photoshop Cafe members.