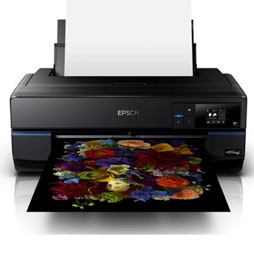
I recently took delivery of the Epson SureColor P800 Printer and put it through it’s paces. (I still have some testing to do with roll paper and panoramas, Il post an update when I have completed testing of that. The P800 is the replacement for the R3880 which I have enjoyed using for a few years.
Watch the video here and see the unboxing, setup and printing on the SureColor P800.
The first thing you will notice, is that the shipping box is Huge! This is a good thing though, because the printer is very well protected in it’s packaging. If you watched the video you will have seen that there is a LOT of blue tape on the printer. This is attached at the factory to secure all the lose and moving parts, so that they won’t be bumped around during shipping. Mission accomplished, the printer arrived at my door undamaged and in pristine condition.
I put the printer through a series of tests and printed a lot of images on a variety of papers and these are my findings.
You can see the full process of setup in my video above. I chose to connect it wirelessly. The printer doesn’t come with a USB cable (Although it supports USB 2). I decided to see if I could connect without using a cable during the process like I have in the past. It was actually very easy to connect to my laptop wirelessly, easier than I thought it would be.
As they say, the proof is in the pudding. After a single print, I could immediately see the improved quality of the prints. The quality of the blacks is something you have to see to believe, it adds so much depth and richness to a print. I can honestly say these are the best prints I have seen from a desktop printer. My (current) favorite papers are the Ultra Premium Photo Paper Luster and Hot-Press Bright. The prints are very sharp with rich-vibrant colors which are accurate to a calibrated workflow. (I would recommend an Xrite Color Monkey or eye1 display pro to match the colors on your screen with print). The prints I have tested are at (17×22). You can print from 2 rear sheet feeders or from the front feeder. There is an attachment for roll pager and an option to pop down the front tray to feed extra thick papers.
Another thing that I am very interested in is panoramic printing. People that are familiar with my work know that I do a lot of aerial photography with drones. I stitch multiple images (sometimes over 100 images in an HDR Panorama) together to create very large panoramic images. If you have never printed any of these panoramas, or seen them printed, you are missing out. I remember the first time I printed one very large, I think it was 6 feet long, I was totally blown away. (the maximum length for a panoramic print on the P800 is 10.7 feet). When you see something with that much detail printed very large it’s a sight to see. Choose carefully before printing a panorama and also run a smaller test print first because, as you can imagine, you consume a lot of ink printing panos.

The SureColorP800 comes with 9 separate ink cartridges. Which includes 4 blacks, which explains why there is so much quality in the shadows of the prints. The printer ships with a “starter set” of inks that contain a little less ink than the replacement cartridges. The initial cartridges are 64ml compared to the replacement cartridges holding 80ml of ink each. (Don’t ask why the initial cartridges have less ink, you can figure that out on your own).
The cartridge colors are:
By including the photo and matt black onboard, ou can change the ink type without pulling and replacing cartridges. (Photo black is for shiny paper where as matt black is for matt papers).
There have been advances in the P800 for switching from M to P cartages where it happens a lot faster and uses less ink than the past. As you can imagine, when you change the ink type, the nozzles have to be thoroughly cleaned so no traces are left. The printer does this automatically, you don’t have to remove and clean anything yourself.
Printing Technology:Advanced MicroPiezo® AMC™ print head with ink-repelling coating technology, 8-channel, drop-on-demand, inkjet print headMinimum Ink Droplet Size:
Maximum Print Resolution:2880 x 1440 dpiMaximum Printable Area:
Nozzle Configuration:180 nozzles x 8
Ink Type:Ink Type: Pigment-based Epson UltraChrome® HD ink technologyInk Palette:8-color Photo or Matte Black, Cyan, Vivid Magenta, Yellow, Light Cyan, Vivid Light Magenta, Light Black, Light Light BlackInk Configuration:
Auto-Switching Black Ink Technology
Ink used during conversion
See Note1Replacement Ink:
Epson Intelligent Ink Cartridges
Ink cartridge shelf life
Operating Systems:
Temperature:
Operating 50° to 95° F (10° to 35° C)
Storage –4° to 104° F (-20° to 40° C)
Humidity:
Operating 20% to 80% (no condensation)
Storage 5% to 85% (no condensation)
Sound Level:Approx. 50 dB according to ISO 7779
Dimensions:26.93″(W) x 14.80″(D) x 9.85″(H)
Weight:43 lb
Safety Approvals:UL1950, CSA 22.2 950 FDA, EMI: FCC Part 15 subpart B class B, CSA C108.8 class B, AS/NZS 3548 class B
In summary, I really have to say that I am very impressed with this printer, I really loved the quality when I previously tested the P600, the P800 delivers the same quality, but with the ability to print larger and on rol lpaper. If you are needing a printer that print at 17″ wide, then the P800 is best of class.
I give the P800 a 5/5 and a PhotoshopCAFE Editors pick!

List Price $1,295.00
This site uses Akismet to reduce spam. Learn how your comment data is processed.
In-depth review and examples of footage on the insta360 ONE R convertible Action Camera + 360 Camera, we also take...

Back up cards without a computer for drones and cameras The LaCIE, DJI Copilot is a brilliant device that lets...
DJI Phantom quadcopter, also called Drones, or UAV, are taking the photography world by storm! We now have a flying...


I am considering getting a 17″ replacement/adjunct to my much older but still functional reconditioned Epson R1900 because it prints only to 13″ and is not wirelesss. I This seems to be the ideal solution, particularly because of the range of blacks.
Two questions: 1) Why did you let the printer determine color instead of using icm profile for paper? 2) You used Epson standard, I always use Adobe Prophoto RGB for the best color range when printing. Does it make a difference with this? It seems that your print was fantastic anyway!
Hi there. Thanks for the comment, First of all, I wasn’t trying to get specific with print settings on this set up video. It’s easy to crap too much into a video and make it overwhelming for a beginner. (I was just trying to show the simplified steps from unbox to print) I will be doing a different video using the new Epson Print Utility soon and get into some of that. I believe the proper profile gets selected when you choose the paper type? Maybe I missed that in my rush, Ill have to go back and check.
As for Prophoto, I know some people like the wider color gamut and I like it for editing, but there are some colors not supported on the monitor and printer. I usually go to Adobe RGB for printing because my monitor and printer support those colors and I get a closer idea of what it will actually look like without having colors clip because they aren’t reproducible. I know there is split-thinking on this, some people use Adobe RGB and some people use Prophoto RGB. But the new Printer Utility is going to change a lot of this and simplify the process and is ehat I’ll be using going forward.
HI THERE, I AM LOOKING FOR A PROFESSIONAL INK JET PHOTO PRINTER. PRIMARY FUNCTION WILL BE PHOTO PRINTING. I AM AIMING FOR AS GOOD AS I CAN GET. I LOOKED AT PHOTO COLOR LASER PRINTERS AND FOUND THEM LACKING. I HAVE BEEN IMPRESSED WITH EPSON PHOTO PRINTERS BEFORE, BUT I NEED TO GET ONTO THE LATEST TECHNOLOGY. PLEASE ADVISE. I AM LOOKING FOR PROFESSIONAL GRADE PHOTO PRINTING. THE PREFERRED PRINT SIZES ARE 8.5 INCH X 11.0 INCH AND 8.50 INCH X 14 INCH. I WANT THE BEST QUALITY AVAILABLE.
I am thinking about purchasing SureColor P800. Will I be able to print from Photoshop CS5?
yes
Hey Colin, have you ever made the video’s on the Epson Print Utility and the canvas role as you stated in the video and in the comments? I just got the P800 and I did the setup with your video by my side: that made it so easy. So now I would like to make the next step and with someone who knows what to do and where to go… please stay with me 🙂 So where can I find the videos or did you never make them – that would be… not so awesome. Great day. Maan
yikes, I never made the next video, thanks for the reminder! adding on my calander
Hey, Colin. Thanks for the video. Took all the pressure off setting up the printer.
Colin” Regarding the P800 Print Utility, I am confused by the page orientation versus the paper size designations. And then there is the LCD panel paper size selector. If I specify a particular card stock, say Red River’s 9×6.25, how do I know whether I put the paper in horizontally or vertically. I cannot get it right consistently.
By default, you are loading the paper in longways through the front sheet feeder.
Choose the orientation is the app you are printing from.
Hi Colin,
I have just purchased one of these (EPSON SC-P800). I unboxed it, took away all visible blue tape and other bits of foam etc. Following the instructions laid out in the manual I then tried to turn the machine on. After selecting my language setting to English, the printer made what I feel is an unhealthy sound and then an error code 0x1512 came up asking me to shut the printer down and turn it back on again. Do you have any idea what might be wrong here? Many thanks in advance for your time.
I suggest contacting Epson directly