Photoshop CS5 New Features (aka Photoshop 12)
Colin Smith
Photoshop is the cornerstone of the Creative Suite. Almost every creative professional leans heavily on the use of Photoshop. Designers, Photographers, 3D artists, Video, Visual Effects, Illustration, even forensic scientists, dental, medical and scientists are using Photoshop. It’s a word regularly used on TV and films, it’s part of pop culture. Everyone has heard of Photoshop and millions of people are using it.
So what does Adobe have up their sleeve this time? What wizardry has been engineered into our favorite app to make it our even more favorite app. What have they injected into CS5 to make us want, no HAVE to rush out and get the upgrade? That’s what you will discover as you read this article. I’l attempt to give you a look at what’s new and also report what it’s like to use. Any features that will change your life, or any tips to save you time? Read on.
64 Bit and GPU
What’s worth mentioning is that Photoshop is 64 bit native on Mac and Windows. Actually all the Adobe CS5 products are 64 bit. What does this mean? It means a performance boost. Not the type you are perhaps thinking though. 64 bit removes the 4Gig of RAM bottleneck. So if you are working on large files, or files consisting of multiple composited images, you will be able to take advantage of more RAM. Also on the performance end of things is the extensive use of the GPU (Graphics Processing Unit). This takes a lot of the graphical load off of the main processer (CPU) and reroutes it to the Graphics card. The GPU is equipped to run these types of processes with effortless ease. So it not only results in faster screen redraws, smoother painting etc. but it also opens up the options for on screen resizing of brushes, live updates, faster scrolling, redraws and zooming.
Hold down the alt/Option key while the brush is selected to sample a color. The new Color wheel displays with the current and selected colors visible.
Hold down Control+Option+Cmd on Mac (Right Click+Alt+Ctrl Windows?) with the brush selected. You get an on screen color picker with Hue/Saturation and Brightness ramps.Very nice!
On top of this, the CPU is able to perform more work because of the helping hand of the GPU. I highly recommend looking into the NVIDIA line of cards for a fast upgrade. The Geforce line is a good cost effective way to gain extra performance. For the power user, consider the Quadro FX models.

The good stuff
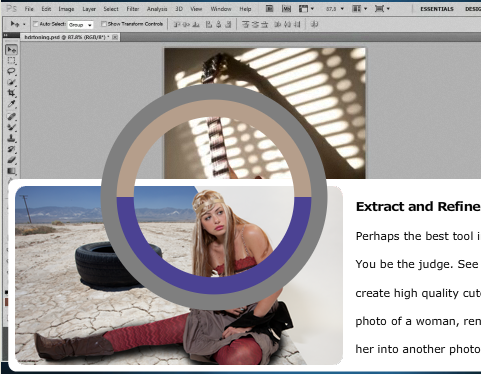
Don’t worry though; there are plenty of sexy additions too. Check out HDR Pro, the Puppet Warp tool, Content Aware Fill, the new Refine Edge tools, new RAW engine, new brushes and paint mixer and much more. Let’s get started with the Refine Edge tool.
Making Selections
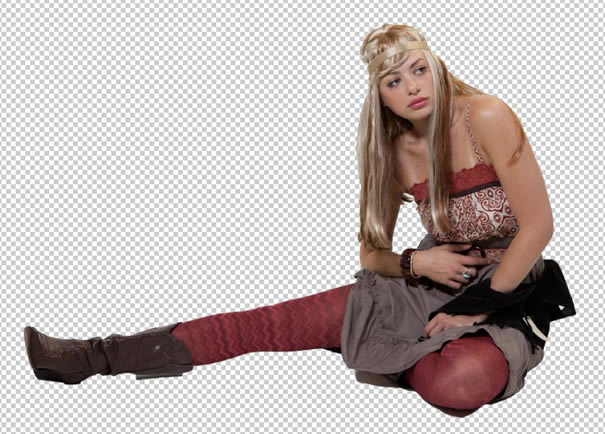
You may well remember that the Refine Edge and Quick Select tools were added in CS3. You also noticed that in CS4 there was a disappearance of the Extract tool. That’s because Adobe had something up their sleeve in CS5. There is a completely different way that Quick Selection and Refine Edge work together in CS5 and it was worth the wait. It’s now really fast and easy to get great looking selections, even on things like hair and fur. This may be my favorite new feature in CS5.
Start by using the Quick Select tool to make a selection. Remember to hold down alt/option to remove from a selection if you get a little too heavy handed.

With the selection active, switch to Refine Edge, you can see it in the Options bar. You will see lots of new options. While refining selections, you will work in the top part of the panel. Notice there is a pull down menu with lots of viewing options.
Here is a little tip to simplify the process. Click on Show Radius. You will notice (as you slide the radius slider in Edge Detection) an edge appears. This is the edge where Photoshop decides what to keep and what to erase.

Now change to your preferred viewing mode and click the little brush tool to the left. Paint over any edges that have background that you want to remove. Hold down Option/Alt and paint over areas that you want to keep. You will notice the display updates after each stroke. But look carefully, the entire selection updates. The more you refine the edge, the better the tool works, really simple.
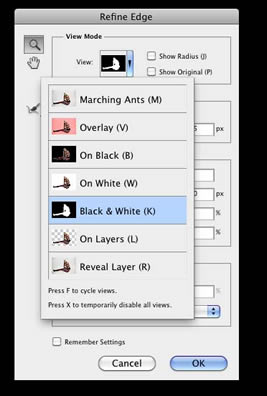
The Adjust Edge tools simply allow you to choose how crisp or soft the edges will be.
Finally, you get to choose how the selection will be applied to the image. You can apply just as a selection; copy the selected object to a new layer; add it as a Layer Mask; create a new Layer with a mask or even a new document. This is really nice and allows for a flexible workflow. What I really like about this, is that it really works. I was able to get faster, cleaner edges than ever before.

Content Aware Fill
Ok, this next feature is really freaky. You may have seen it before because Adobe leaked it to the public a couple of times before the launch. How about a magic retouching tool?


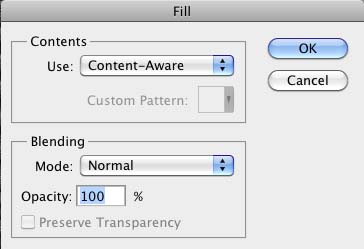
Simply put, you have something you want removed from a picture… Don’t reach for the Clone Stamp (anymore). Make a rough selection with the lasso tool. Then choose fill (Keyboard Shortcut is Shift+Delete, Shift+Backspace on PC). Select the option Content Aware from the drop down menu and click Ok. Wait a few seconds and then like magic the object is removed and replaced by the texture of the background. This is a random effect with no real options, it either works on the image or it doesn’t. More often than not, it does work, and work well. I find that applying it over all, and then reapplying o some smaller areas yields the best results. What it doesn’t work very well on is areas with a strong perspective.
HDR (High Dynamic Range)
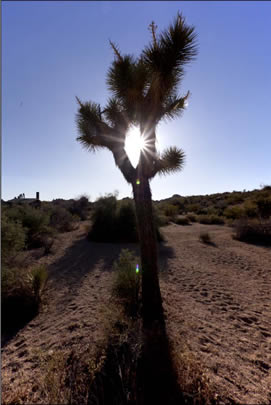
First of all, let me clear up a misconception of what HDR is. The human eye is capable of seeing more details in shadows and highlights simultaneously than a camera. The range of light to dark with visible detail is called the dynamic range.
This image shows what typically happens in a high contrast scene. Notice that the exposure is pretty good. However I was unable to capture the detail outside because it’s too bright. Also some of the shadows are plugged up because they are too dark. This is known as a Standard or Low Dynamic Range image. It’s a RAW file. With some adjustments, I could coax some extra detail out of the shadows, but the Highlights are totally gone.


Or how about another exposure to show all the detail in the Iron banister. Notice that many parts of the photo are now over-exposed.
The solution is to shoot a series of Photos that covers the entire Dynamic range. In this case I took 7 shots, each of them 2 stops apart. (Each F stop is double the brightness of the previous.)
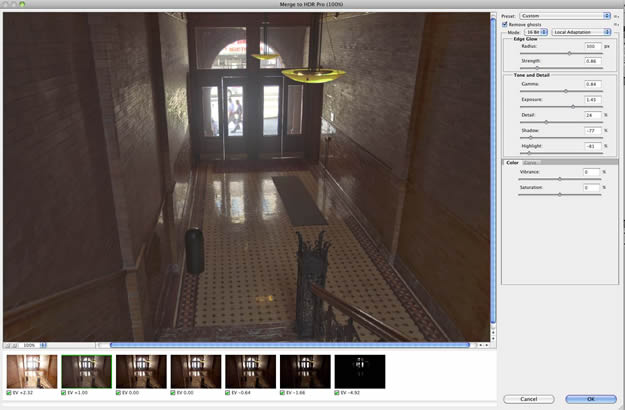
Then using the new HDR Pro (a beefed up Merge to HDR) we are able to merge the Photos into a 32 bit image.
There are some significant enhancements in HDR in Photoshop CS5.
Anyone who knows anything about HDR knows that Photoshop is the best tool for merging images into HDR. I have heard some instructors, mistakenly suggest using Photomatix for merging. (Bad idea, because Photomatix converts RAW to JPG at merging point, thus throwing away ½ the dynamic range. Now Photomatix for tone mapping is a different story altogether).
When there is movement between Photos (camera shake, or blowing clouds, leaves or water etc) , doubling (also called ghosting) occurs.
A new feature in CS5 is the remove Ghosts button. When you click this, Photoshop does a pretty good job of de-ghosting. Notice that there is a green box around the de-ghosted image.
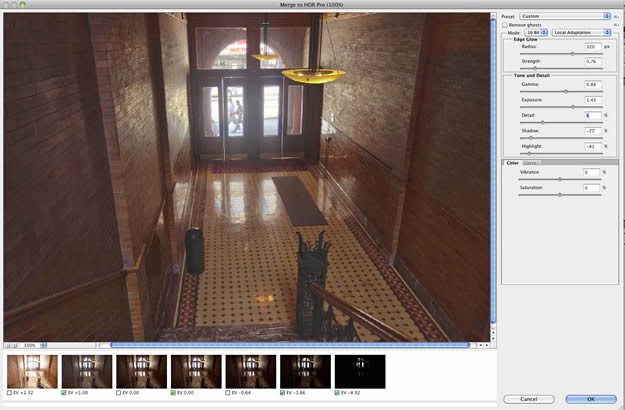
Try clicking a different thumbnail to set a different de-ghost and produce a very different result.
Tone Mapping
The 3rd part and the magic of HDR is the Tone Mapping. You can’t use a 32 bit image so we need to choose the tones to display the photograph. Photoshop now includes a decent Local Adaption for tone mapping. In the past we had to use programs such as Photomatix to do high quality Tone Mapping. There is still a place for Photomatix, but Photoshop now does a pretty decent job of Tone Mapping.
Photoshop CS5 excel’s in natural looking Tone Mapped HDR photos and contains lots of options to get the image looking the way you like.

You can also use it to create surrealistic looking images that people either love or hate. I personally like them when done correctly, which sadly is rare.

It takes a keen eye and some skill to produce a surrealistic HDR that isn’t ruined by halos and oversaturation. Check out my full tutorial and DVD for more on HDR.
HDR Toning
This is a filter than can produce a Stylized HDR “looking” result on a single image. Personally I don’t like the name HDR, because it’s not possible to create a single image HDR. “Wait!” you might say, “I’ve seen single image HDRs, or Pseudo- HDR”. Reread the explanation of HDR again and you will notice a photo isn’t an HDR because of the Tone Mapping, it’s because of the Dynamic Range. A single Photo will always be LDR (Low Dynamic Range) no matter what you do to it. It’s like taking a mono signal, playing it through 2 speakers and then calling it stereo.
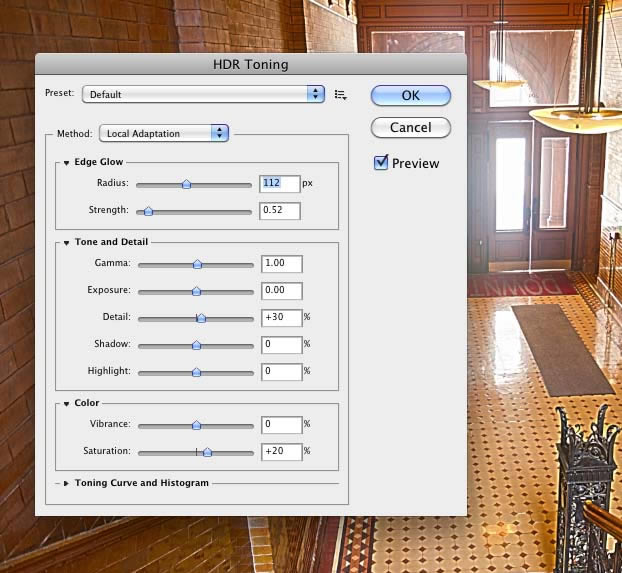
Have a look at this Single Image raw file pushed through HDR toning. Notice, the blown out areas in the doorway, they don’t gain detail, they just turn gray. The reason is that the detail wasn’t captured on the camera and therefore impossible to recover on any type of imaging.

Having cleared that up, the HDR Toning tool does a good job of simulating a tone mapped look on a LDR image. For what it does it does well, just don’t expect miracles. HDR toning converts the image into a 32bit space and allows you to make some tonal adjustments. When you click Ok it goes back into its 16 or 8 bit space. It’s a cool looking filter that many people will enjoy when they only have a single exposure to work with. However I strongly recommend doing real HDR for the best results.
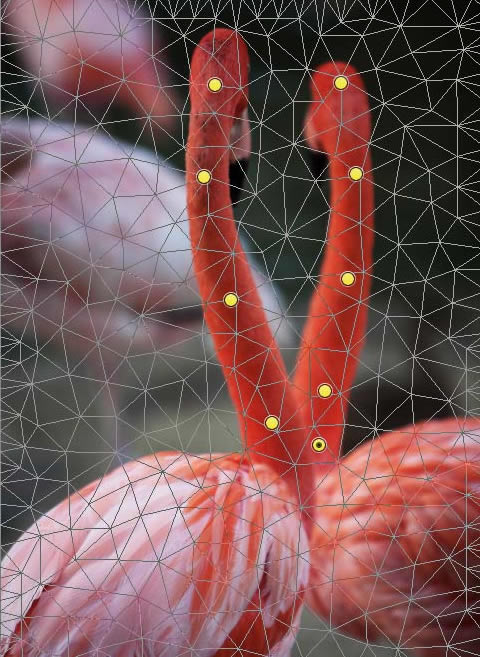
Puppet Warp Tool
This is a great tool for people who are into Photo manipulation. This tool allows you to add anchor points to your image. You can then drag the points to warp the shape of the image. You can use the unselected points as anchor points. You can select multiple points by holding down the shift key.
This is a little akin to “rigging” a character for Inverse Kinematics, a 3D and animation term. The difference is that you can warp the image anyway you like. This is a lot better than the liquefy tool for these types of purposes. I can imagine that people are going to have a lot of fun with this tool!
To truly understand what it does; watch the free video I created on it.
Tip: Hold down shift to automatically select points as you add them.
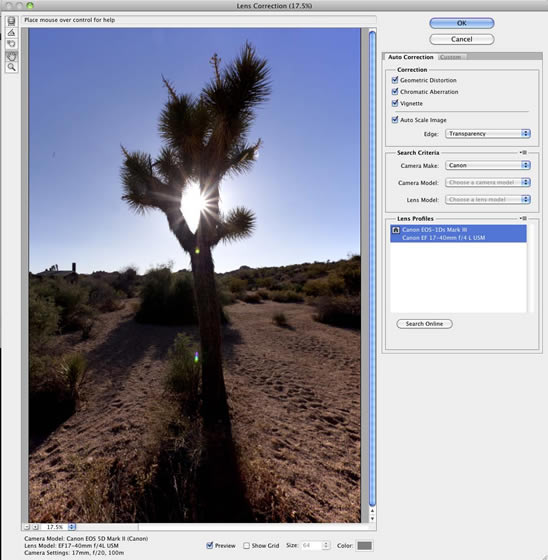
Lens Correction
The new lens Auto correction is really good. Photoshop contains a database of common cameras and lenses. It then looks at the metadata and makes adjustments to the curvature, aberration (color fringes) and vignette to automatically fix some of the most common lens issues. As you can see it does an amazing job on removing vignetting. It also does a good job of geometric distortion. Although sometime you will prefer the distortion because we are so used to looking at it, sometimes a photo looks odd without it. This all depends on the photo of course and many wide-angle photos look better corrected.

New Brushes
I’m not going to get too much into the brushes here because Jane and Wes have written plenty about them. I also have a
video for you to see them demonstrated.
In a nutshell, we now have natural bristles and new mixer brush that smudges the colors. You can paint from scratch or you can paint over a photo for a hand painted look.

Other Changes
There are a lot of other changes in Photoshop CS5. Let me touch on a few.
Work Space Switcher
We have had the ability to choose and save different workspaces for some time now. This release it has been brought to the forefront. There are now workspace buttons at the top the screen. This controls panel layout, menus and menu highlighting as well as tool presets and Menu highlighting.
![]()
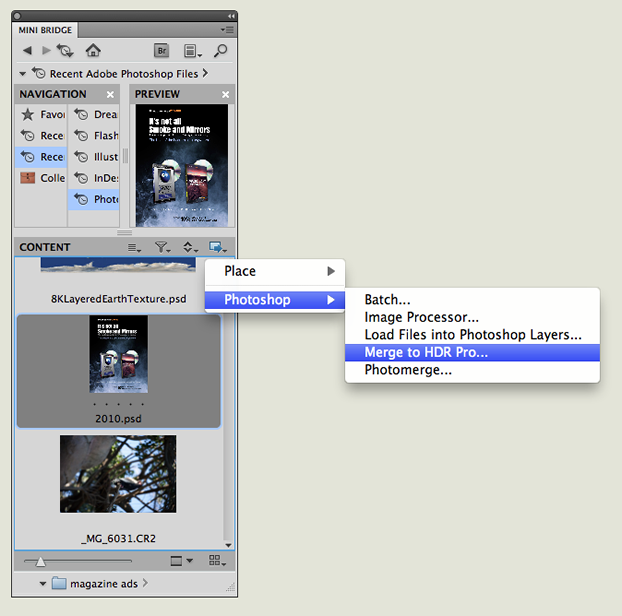
Mini Bridge
Have you even been working in Photoshop and you have the need to quickly grab an image. You don’t want to leave Photoshop for Bridge or even use an open menu. You know, when you’re in the zone and really focused. They have now added a small version of Bridge in a panel. It’s called Mini Bridge and it’s really useful in a jam or when you are working with lots of images. Personally I prefer Big Bridge because it’s faster. You also have to have Bridge running for Mini Bridge to display.
I do find Mini Bridge really useful for things like HDR, because I can merge them directly from Mini Bridge without the clutter of multiple photos on my desktop.
Paste in Place
Paste inside has a few new options.
Paste in Place, Paste inside and Paste Outside. These little tweaks are bound to help you out a lot. I especially will use Paste in Place a lot.
JDI Changes
During the development process, Adobe told all the engineers to take time off what they were working on. During this time the focus was on working on “the little things”. Adobe looked at customer requests and made many little tweaks that have been requested. They called these JDI (Just do it). Here are some of the JDI enhancements in CS5
.Delete Empty Layers Script
.Convert a 16bit file to 8bit without a dialog box on save to jpeg
.Neutral Density Gradient Preset
.Straighten image button added to ruler
.Turn off/on Gesture support
.Default for Shadow Highlight changed to 35%
.Can move a selection while to Active layer is hidden. Doesn’t move the layer, just the selection.
.Option to always default to last saved folder
.You can drag and drop a file into an open PSD to create a layer
.Shift+Enter puts focus on the text fields on an adjustment layer. They also open with the focus on .the text fields. This saves time because you can apply keyboard commands right away.
Conclusion
I am more excited about this release of Photoshop than I have been for a while. I believe this is the biggest update we have seen for a while and there is something for everyone. Would I recommend upgrading?Tune in next week to find out. Just kidding! I recommend Photoshop CS5 without hesitation!
About the Author
Colin Smith is a best-selling author, trainer, and award-winning new-media designer who has caused a stir in the design community with his stunning photorealistic illustrations composed entirely in Photoshop. Colin is also known as a pioneer of HDR photography. He is founder of the world’s most popular Photoshop resource site, photoshopcafe.com, which boasts over 20 million visitors.
With over 14 years of experience in the creative industry, Colin was formerly Senior Editor and Creative Director for VOICE magazine. He is a regular columnist for Photoshop User magazine. He has been featured in most major imaging magazines including, Computer Arts, Macworld, After Capture, PSD Photoshop, Advanced Photoshop, Photoshop Creative, Digital Photographer, Web Designer magazine and a host of others..
Colin’s graphic design work has been recognized with numerous awards, including, MacWorld Digital Design and 3 Guru awards at Photoshop World 2001 and 2002, for his work in both Illustration and Web Design. He’s authored or coauthored more than eighteen books on Photoshop, including the best-selling How to Do Everything with Photoshop CS and CS2 (McGraw-Hill/Osborne, 2005) and award-winning Photoshop Most Wanted: Effects and Design Tips (A Press/Friends Of Ed, 2002). Colin is also creator of the Photoshop Secrets Video training series (PhotoshopCD.com). He is in high demand across the USA, presenting his Photoshop techniques to Photographers and graphics professionals across the nation. He has been a speaker at such conferences as Flash Forward, NVision, Photoshop World, PIDE, WPPI, PIDE, DL Expo, Creative Suite Conference, Cre8, Create Chaos, Deviant Art Summit and many more. In 2008 Colin was the featured speaker for a Sold out Multi-City Tour (Flash Summer Camp) Sponsored by Adobe and Lynda.com. Colin has consulted such companies as Adobe Systems, Edison International, Apple and Disney Studios.
Photoshop CS5 for Digital Photographers
New DVD by Colin Smith
This ground-breaking 5th release of Photoshop Secrets for Digital Photographers, will blow your socks off! Colin has pulled out all the stops. All the workflows have been fine-tuned to take advantage of the new features in Photoshop CS5. Don’t just learn the features, integrate the skills into your everyday workflow.
7 Hours
64 lessons
Full-screen playback and works on iPad
It doesn’t get any better than this!
How to use the new features in the frame tool in Photoshop.
New features of Lightroom Classic CC, speed and range masking tutorial, See the range mask in action on the brush,...
New Enhance Detail in Photoshop gets better resolution using Generative Fill and Generative Expand